Designing Hybrid Framework in QTP – Part 4 [Final Part]
We started the ‘Hybrid Framework in QTP‘ series with an article that covered the basics of hybrid framework in QTP. This series of posts would be concluded here in this 5th and final part where we will cover some of the remaining topics about the hybrid framework. We will also provide the sample framework code at the end of this article, which you will be able to download and modify as per your needs.
A bit of background
Before getting into the details with this article, we will first have a brief look at the topics that we had covered in the previous article of the hybrid framework series. This will help set up a background which we will then follow up with this article. If you would have read the last article on the hybrid framework (Designing Hybrid Framework in QTP – Part 3), you might recollect that we had started that article with a framework which contained only 1 test case and had QTP modular framework features implemented in it.
We took the framework from that stage and added the capability of fetching data from excel sheets. Then we created the batch excel sheet and implemented the VBScript logic that will actually execute the test case in batch mode. When we finished that article, we had taken the hybrid framework to a point where we had implemented data handling and batch execution features to it.
In this article also, we will do the same thing. We will pick up the framework from where we had left it and will add some more features to it. The end result will be a full fledged working hybrid framework which you would be able to download and use as a base for creating much more better frameworks in your projects. Let us now start with the list of topics that we will cover in this article.
What’s in store for this article
Following are the topics that you will read about in this article –
1) Adding the remaining 2 test cases to the framework
2) Implementing the 3-tier reporting structure
3) Adding auto-email functionality to the framework
4) Sample downloadable framework code
5) Further suggestions for improving the framework
Adding the remaining test cases to the framework
Till now, the framework that we have created contains only one test case. When we covered the basic approach for creating a hybrid framework, we had mentioned that you start with a single test case and then add various framework features around it. Once most of the important features have been incorporated, then you should start adding the further test cases to the framework.
Currently you have the hybrid framework at a stage where most of the important features (such as code modularity, data handling capability, batch execution) have been added to it. The features that you still have to add are 3-tier reporting and auto-email capabilities. Now both these features can be considered as good to have. They can’t be classified as core must have features. Even if you don’t implement these features, you will still have a basic hybrid framework to work with.
So, going by the above logic, now is the time when you can add the remaining test cases to the framework. The below image shows the test cases that are to be added to the framework.

Approach to add the test cases to the framework
When we started creating the hybrid framework from scratch, the first step that we performed as to add a test case to the framework. And the approach we had followed at that time was this –
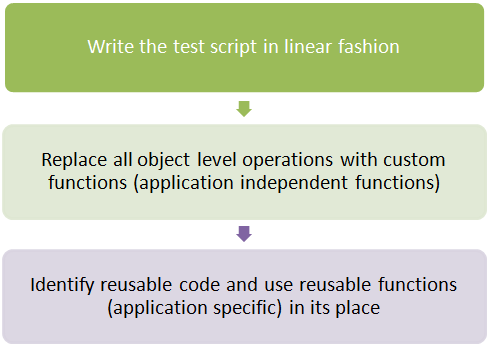
The reason we followed this approach in the beginning was, because at that time, the hybrid framework was nothing but a collection of folders (as defined by our folder structure). We didn’t have reusable functions or any other code at that time with us. Hence, we had to create the first test case in linear fashion.
But now, at this point, you have the reusable function libraries (both application independent and application specific functions) and various other capabilities built into the framework. So this time, you should not try to write the test case in linear fashion first and then convert it by adding functions to it. Now, while writing the test script, you should directly use the reusable functions wherever applicable.
Once you added both of the remaining test cases, you would have 2 additional test scripts in your framework. As with the structure of the first test case, these additional test cases would look something like this –
Test Case – TC02_CreateAndUpdateOrder
fnLogin()
fnCreateOrder()
fnUpdateOrder()
fnCloseApplication()
Test Case – TC03_CreateAndDeleteOrder
fnLogin()
fnCreateOrder()
fnDeleteOrder()
fnCloseApplication()
As you had done in case of the first test script, the code for these new functions (like fnUpdateOrder, fnDeleteOrder) should also be stored in the application specific function library.
Executing the newly added test scripts
Once you have added the new test scripts, the next step would be to see that these test scripts are working fine. First you should run both these newly added test scripts individually through QTP. Bu you shouldn’t stop here. There is another important point that needs to be checked. Since you have implemented the batch execution functionality, its only logical that you execute all these test cases in batch mode to verify that the code you have written for batch execution works fine for multiple test cases also.
In order to check this, open your batch excel sheet. You would have noted that we have already added all the test cases in the batch excel sheet. But only the first test case is marked as ‘Yes’. Since you want to execute all the 3 test cases, set the value in ‘Execute’ column to Yes for all the 3 rows. Save the excel sheet and click on Execute button. Check that the framework executes all the 3 test cases one after the other without any issues.

Important Note: Till now in this article, what we have done is – we took the framework with whatever features it had and then we added all the remaining test cases to it. And our plan is to add the remaining features (reporting, auto-email) in the framework after adding all the test cases. This approach works fine in this scenario because we have very few test cases. However, in real life circumstances you would have a lot of test cases that have to be automated.
In such a situation, you shouldn’t just add all the test cases in one go and then later add more features to the framework (like the way we are doing it here). The ideal way to work then would be to add few test cases, then implement couple of features, then again add few more test cases followed by more features. This is a proper, balanced way which you should follow to improve the framework together with adding more test cases to it.
Test Script Reporting – 2 Basic Rules
When it comes to implementing the reporting features in your automation framework, there are 2 basic rules that you should always try to follow. These rules are –
1) Never overwrite the test results: When you normally execute a test case multiple times, what QTP would do is that it would overwrite the previous results with the new ones. This should be fine when you are running a one-off test script randomly, but its a strict no when you actually execute your test scripts as a part of an automation framework.
This becomes much more important when you execute lot of test scripts on a daily basis. There might be times when your client would want to see some sort of report or projections about the number of test cases getting executed or defects being reported on a daily basic. This information would not be available with you if you keep overwriting your test case results.
One of the easiest ways you can use to “not overwrite your test results” is to append the test result file name with a unique random string. Having a unique random file name will ensure that your test results are never overwritten. And what would be a better way than using a date-time stamp as the unique, random string? Apart from providing a unique file name every time, date-time stamp provides you another advantage wherein you would find it easier to sort of the test results and number of test runs based upon dates.
2) Provide test result reporting at different levels: This is another important feature that you should always try to incorporate in your framework. Consider a scenario where you have hundreds of test cases in your automated regression suite and you have only implemented QTP’s standard reporting format in your automation framework.
Now, imagine that you test lead or project manager asks you the status of test run (with some basic information about which all scenarios have passed or failed). In such a situation, you cant just show the QTP result of each and every test case to your manager. He may not have time to go through all the details or may not be technically that good with QTP to understand the test results. A good solution in this situation would be to have all the test cases listed in an excel sheet with a “Passed” or “Failed” against each of the tests. This excel would act as a summarized report which would be easier for your manager to understand.
Extend the above scenario further to assume that your program manager or client needs a report on the test runs. In most of the cases, these people work on a lot of different projects and hence they mostly don’t track the execution to the test case level. For them, its just the basic information (like total number of test cases executed/passed/failed and some general data around the number of defects) that matters.
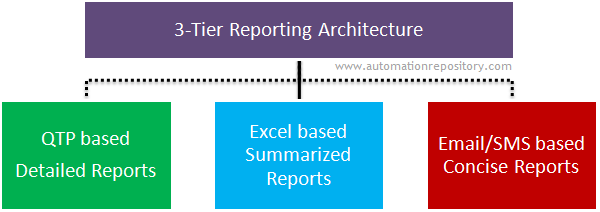
Hence, its important that your automation framework itself prepares all this data at different levels rather than you having to figure it out manually. So keeping in mind the importance of this reporting structure, we have decided to incorporate this 3-tier reporting mechanism in this automation framework. This 3-tier reporting architecture would contain reporting at the following levels –
Implementing the 3-tier Reporting Structure
In the previous section, you saw why its important to create a reporting structure that caters to different sets of audience. In this section, we will show how you can actually implement this reporting mechanism in your framework.
1) QTP based Detailed Reports: ‘QTP based Reports’ is the default report where you have separate QTP result file for each test script run. QTP based detailed reports are the easiest to implement as they are automatically generated by QTP when you execute a test script. So in most of the cases, there’s nothing additional that you would need to do from your end to implement this. A normal QTP based result would look something like this –
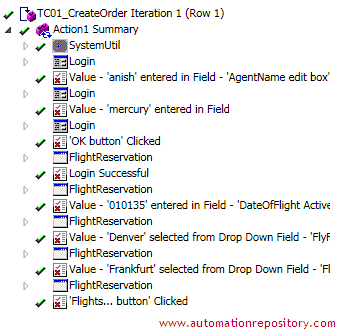
So, when you use the batch excel sheet to execute the test scripts in batch mode, QTP will automatically generate the test results for you. The only thing that you have to do from your end is to provide the location where these results would be stored. Also, as discussed in the previous section, you would need to append the result file name with date-time stamp so that the file name is unique and the results never get overwritten. The logic that we will use to come up with the unique result location for a test case is this –

Since the code for batch execution is added in DriverScript.vbs file, you would need to make the following code changes in the file so that the QTP result for each test case gets stored in its appropriate location.
'Create the Run Results Options object
Set qtpResult = CreateObject("QuickTest.RunResultsOptions")
'Set the results location
sQTPResultsPath = sQTPResultsLocation & sTestCaseName  & "_" & sDateTimeStamp
qtpResult.ResultsLocation = sQTPResultsPath
'Run the test
qtpTest.Run qtpResult
The above code would first set the result path to the folder location you specified. And then when the test script is executed, QTP would store the test run result directly to that folder location. This is all that you have to do to implement the “QTP based Detailed Reports” in your framework.
2.1) Excel based Summarized Reports (Design Part): The most basic Excel based Summarized Report is one where you have an excel sheet with just 3 columns – first column would store the test case name, the second one would contain the status of the test script run, and the third column will have a link that will point towards the detailed QTP based result for that test case. This basic excel based report will look like this –

However, its a good practice to extend this excel based report to add some more columns to it. Some other frequently used columns that you can add here are – test case execution date, execution start time, end time and the total duration of execution. Other than these, there might be some other fields that you would need to add depending upon your project requirements. The format of the excel based summarized reports that we will use in this framework is shown below.

2.2) Excel based Summarized Reports (Coding Part): You would need to follow the below mentioned steps to implement the excel based summarized reports in your framework.
Step a) The first step is the actual creation of this excel sheet. This is how it would work. Whenever you execute some test cases in batch mode, the automation framework would first create a blank result excel sheet. This blank excel sheet would just contain the headers and different columns (as mentioned in the above image). The framework would append a date-time stamp with this result sheet and save it in its intended location. Only after this excel file is created would the automation framework start executing the test cases. The code to create this blank excel result file is given below –
Set objExcel = CreateObject("Excel.Application")
objExcel.DisplayAlerts = False
Set objWorkbook = objExcel.Workbooks.Add()
'Set Header
objExcel.Cells(1, 1).Value = "TestCase_Name"
objExcel.Cells(1, 2).Value = "Status"
objExcel.Cells(1, 3).Value = "Test Results Path"
objExcel.Cells(1, 4).Value = "Execution Date"
objExcel.Cells(1, 5).Value = "Start Time"
objExcel.Cells(1, 6).Value = "End Time"
objExcel.Cells(1, 7).Value = "Duration"
'Save and close excel
objWorkbook.SaveAs(sBatchRunPath & sTimeStamp & ".xls")
objExcel.Quit
Set objWorkbook = Nothing
Set objExcel = Nothing
Step b) Once the blank result sheet has been created, the next step would be to update this excel sheet as and when a test script is executed. For this, what the automation framework would do is that, every time it executes a test script, it will first capture all the necessary details about the test run. After this, the framework will open the result sheet and will update the result. Thereafter, it will close the result excel sheet. The code for this is given below.
'Open Result Sheet and update the result
Set objExcel = CreateObject("Excel.Application")
Set objWorkbook = objExcel.WorkBooks.Open(sBatchRunPath & sTimeStamp & ".xls")
objExcel.DisplayAlerts = False
'Set the results
objExcel.Cells(iResultSheetRowCounter, 1).Value = TCName
objExcel.Cells(iResultSheetRowCounter, 2).Font.Bold = TRUE
objExcel.Cells(iResultSheetRowCounter, 2).Value = Status
'Color status
Select Case Status
	Case "NA"
		objExcel.Cells(iResultSheetRowCounter, 2).Font.Color = RGB(139, 137, 137)
	Case "Passed"
		objExcel.Cells(iResultSheetRowCounter, 2).Font.Color = RGB(0, 100, 0)
	Case "Failed"
		objExcel.Cells(iResultSheetRowCounter, 2).Font.Color = RGB(245, 0, 0)
	Case Else
		objExcel.Cells(iResultSheetRowCounter, 2).Font.Color = RGB(255, 255, 0)
End Select
objExcel.Cells(iResultSheetRowCounter, 3).Value = TestResultPath
objExcel.Cells(iResultSheetRowCounter, 4).Value = ExecutionDate
objExcel.Cells(iResultSheetRowCounter, 5).Value = StartTime
objExcel.Cells(iResultSheetRowCounter, 6).Value = EndTime
objExcel.Cells(iResultSheetRowCounter, 7).Value = Duration
'Save and close excel
objWorkbook.SaveAs(sBatchRunPath & sTimeStamp & ".xls")
objExcel.Quit
Set objWorkbook = Nothing
Set objExcel = Nothing
Step c) The automation framework would perform the above step (step b) for all the test cases that are executed as a part of that batch. Once all the test cases are executed, QTP will stop the execution and you will be left with the summarized excel report that will contain the results for all the test cases executed as part of that batch.
3) Email/SMS based Concise Reports: The concise report that you would create will contain a very high level information about the test run result. It would just provide a quick summary about the number of test cases executed together with the passed/failed numbers. This concise report when sent as an email would look something like this –
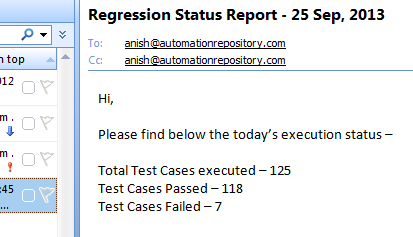
This concise report would mostly be used while sending emails and SMSes. Since, we will only be dealing with sending emails in this framework, the coding part of the concise reports would be covered in the Email section.
Adding auto-email functionality to the framework
Whenever you execute a set of test cases in batch mode, the hybrid framework would provide you an option to send an email automatically to a set of recipients. This email would notify the recipients that the batch run has been completed. This email would also provide them, the information about the status of the batch run.
Whenever you execute a set of test cases in batch mode, the automation framework will keep a track of the number of test cases executed/passed/failed by using some global level variables. These variables would be updated by the following code. You should be adding in the DriverScript.vbs file.
'Number of test cases executed till now
iTestCaseExecuting = iTestCaseExecuting + 1
'Find Run Status
sRunStatus = qtpTest.LastRunResults.Status
Select Case sRunStatus
	Case "Passed"    iTotalPassed = iTotalPassed + 1
	Case "Failed"	 iTotalFailed = iTotalFailed + 1
	Case Else	 iTotalOthers = iTotalOthers + 1
End Select
Once you have all the numbers ready, you can then use them in the email to send the concise report to the intended recipients. The code for sending the email is given below.
'Create an object of type Outlook
Set objOutlook = CreateObject("Outlook.Application")
Set myMail = objOutlook.CreateItem(0)
'Set the email properties
myMail.To = sEmailTo
myMail.CC = sEmailCc
myMail.BCC = sEmailBcc
myMail.Subject = sEmailSubject & " - " & Date
If sEmailBody = "" Then
  sMessage = "Total Test Cases Executed - " & iTestCaseExecuting - 1
  sMessage = sMessage & VbCrLf & "Passed - " & iTotalPassed
  sMessage = sMessage & VbCrLf & "Failed - " & iTotalFailed
  sMessage = sMessage & VbCrLf & "Others - " & iTotalOthers
  myMail.Body = sMessage
ElseIf sEmailBody <> "" Then
  myMail.Body = sEmailBody
End If
'Send the mail
myMail.Send
WScript.Sleep 2000
'Clear object reference
Set myMail = Nothing
Set objOutlook = Nothing
The above code assumes that you have Microsoft Office installed and configured on the machine from where you are executing the test scripts. In case you want to use GMail or Yahoo to send the emails, you can refer to this link which would provide you with the appropriate code for sending the emails (How to send emails using QTP from GMail and Yahoo).
Once you have implemented the email functionality in the framework, run all the test cases in batch mode once again. Check that all the test cases are executed and you receive an email thereafter which correctly mentions the status of the test execution.
With this, we come to the end of the coding part for the hybrid automation framework. Most of the important components that we had set out for in the beginning have been incorporated in the framework. You can download the entire framework code from the below link. The next section in this article will focus on some ideas that you can incorporate in this framework to make it even better.
Further suggestions for improvements/changes in the framework
Whatever we have created till now in this and the last couple of articles, is a framework at a very basic level. The components that we have used in this framework – such as object level functions, data handling capabilities, batch execution features, email, reporting etc – are very common and you would find these in almost all good hybrid frameworks.
As mentioned earlier also, the basic reason why we have used only the common components in the framework, is because we want to keep this framework as simple as possible, so that its easier for the beginners to understand all the concepts. However, this shouldn’t stop you from playing around with the code and improving it further by adding more features to it. In order to help you with this task, we have provided a list of suggestions that you can try to incorporate in this framework to make it more robust and better suited for your needs. This list of suggestions is given below –
1) Why just Outlook for Email? Well, Microsoft Outlook is one of the most widely used email clients in corporate world, more so in the case of bigger companies. More often that not, you would find yourself using Outlook for sending emails. But there are many other companies that use GMail or some other email clients within their organizations. So, one suggestion to make your framework more robust, is to implement the logic for sending emails through other email clients also.
The best way to do this would be to provide an option to your automation team to select the email client of their choice (the team should select the email client that’s configured on their machines). And based upon their selection, your automation framework should use that email client to send the emails.
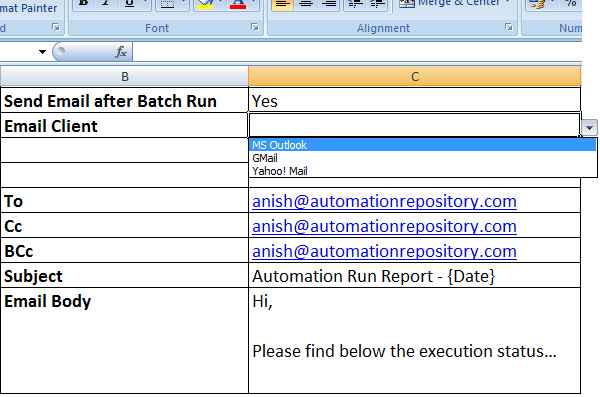
2) Option to configure email externally without touching the code. Assume that you have created the hybrid framework that’s currently being used in your project. Since its you who has created it, you would be knowing all the details and all the code in the framework. But it would not be right to assume that every team member using the framework would have the same level of understanding and comfort with the code.
Hence, one of the objectives of any automation framework is to provide a mechanism to make certain changes without actually touching the code. If such a feature is provided, users would be able to easily modify certain things without having to touch the code, thereby reducing the chances of accidentally breaking something in the framework.
Configuring the email settings is a good example that can (or ideally should) be kept separate from the code. For example, rather that modifying the code to make changes in To, Cc or Body of the email, you can keep these things in an excel file and let the users directly modify the excel file. Your automation framework would simply read the excel file and send the emails based upon the data provided there. The below image would give you an idea about how this excel sheet would look like.
3) Intermediate status messages. This is something that many of you would have actually faced while working on automation projects. Imagine a situation where you are executing an automated regression suite that contains a lot of test cases (say more than 100). Once you click on execute button, there is nothing much to do other than just stare at the screen to see how the test execution is progressing. We all know how boring this can get. :–)
In such situations, you might go away from your desk for some time. For a coffee break or something else. When you return back, you see that the test cases are still getting executed, but now you might not have an idea about the number of test cases that are still remaining and hence the approximate amount of time the execution would go on for.
In such a case, having an intermediate status message is very useful. This ‘intermediate status message’ might simply be an auto closing pop-up message box that gets displayed after every test case run. You can configure this pop-up message to display the basic information, such as the total number of test cases executed till now, total test cases passed/failed till now. This information would help you get an idea about how well the execution is proceeding and approximately how much more time would the execution proceed for. An example of such a pop-up message box and its code is given below.
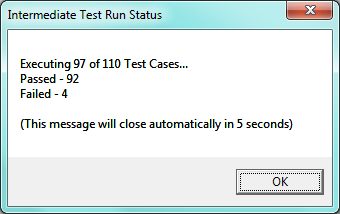
'Prepare the message to be displayed
sMsg = "Executing " & iTestCaseExecuting & " of " & iTotalTestCasesToBeExecuted & " Test Cases..." & VbCrLf
sMsg = sMsg & "Passed - " & iTotalPassed & VbCrLf  & "Failed - " & iTotalFailed
sMsg = sMsg &  VbCrLf  & VbCrLf  & "(This message will close automatically in 5 seconds)"
'Display the message for certain number of seconds
Set WshShell = CreateObject("Wscript.Shell")
WshShell.Popup sMsg, 5, "Intermediate Test Run Status"
Set WshShell = Nothing
4) Using VBA instead of VBScript for batch execution code. As part of this hybrid framework creation process, we have used VBScript to write the logic for batch execution. The only reason we did that was because we were more comfortable with VBScript than with VBA. But if you try to switch to VBA, it wouldn’t make any difference from framework’s functioning point of view. However, the plus point here would be that you would get to work on and learn something new, i.e. coding in VBA.
5) Framework configuration through external means. This is an extension of the feature that we had covered above in point #2. Configuring the email options is not the only thing you can do without touching the code. There would be a lot of other things in the framework that you may want to configure by external means. The below image shows some more things that you can configure by using excel sheets as an external mechanism.
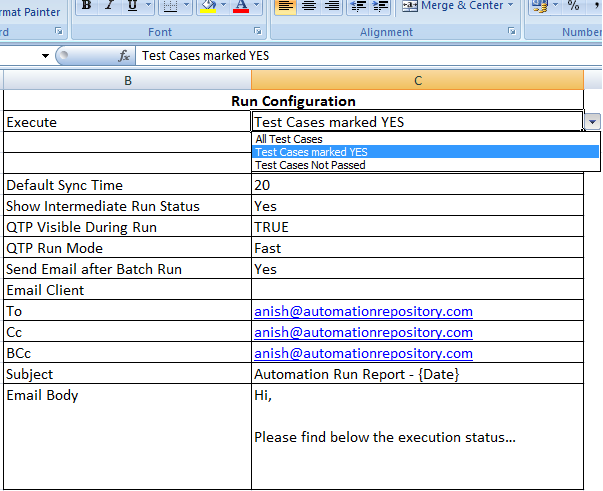
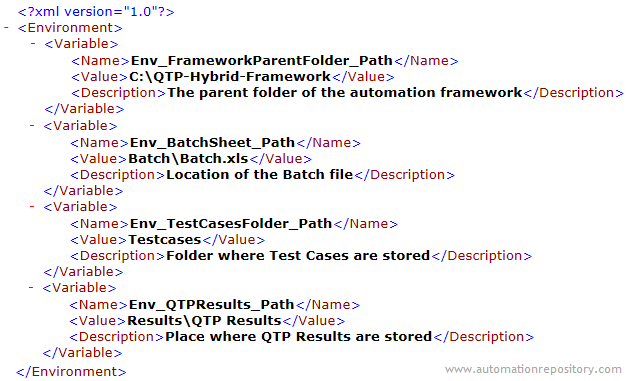
6) Keeping all the folder locations at a single place. If you would have observed, this automation framework works with a lot of different folders (like folders for test cases, data sheets, results etc). And all these folder locations have to be specified somewhere within the code so that the framework can access it as and when required. Currently, all these folder locations are scattered at multiple places within the framework. One good idea would be to keep all these locations in a single place, preferably in an XML file.
The main advantage of this approach is that it would be easier for everyone to update the locations, as all of them would be available at a single place. If you want to follow this approach, you would have to include additional code in your framework that would read the XML file and extract all the folder locations from it. The below image shows you the sample structure of such an XML file.
With this, we conclude the ‘Hybrid Framework in QTP’ series. Hope you would have enjoyed reading these articles and would have got something useful to learn. Download the code and let us know if you face any issues while running it. You can pour in your thoughts about this article/series by using the comments section.
If you enjoyed this article, you can join our blog to get new articles delivered directly in your inbox.
Visit QTP Frameworks Main Page for more articles on QTP Frameworks. You can also visit our QTP Tutorials page for detailed QTP Tutorials.


