Designing Hybrid Framework in QTP – Part 3
In the previous article on Hybrid Framework in QTP, we started writing the code to create the Hybrid Framework. We created one test script (in linear fashion) and then implemented the features of QTP modular framework into it. In this article, we will take up the same framework and extend it further by adding more features to it. We will start by adding the capability to fetch the data from excel data sheets and then will implement the batch execution functionality to the framework.
Topics covered in this article
Following are the topics that we will cover in this article –
a) Approach used to fetch data from excel sheets
b) Structure of the excel sheet and the actual code to fetch the data
c) Different ways to achieve batch execution with QTP
d) Preparing the batch excel sheet
e) Implementing the VBScript code to execute the test scripts from the batch sheet
How would data be fetched from excel sheets
Right now, the hybrid framework that you have with you doesn’t have the capability to fetch data from excel sheets. You have created custom functions (application independent functions) for all the QTP operations. And many of these custom functions have a parameter where you directly pass the data which you want to enter in the application. For example, the function fnSetValueInTextField takes whatever value you provide as an argument and then enters that value in the application. This is how it currently works –
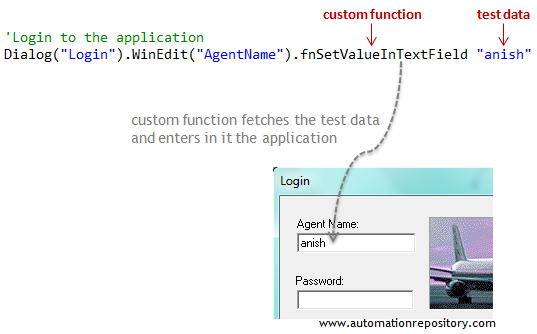
But we don’t want our framework to work this way. What we want is that our data should be stored in excel sheets and the custom function should fetch the data from the excel sheet itself. So, our approach to fetch the data would be like this –
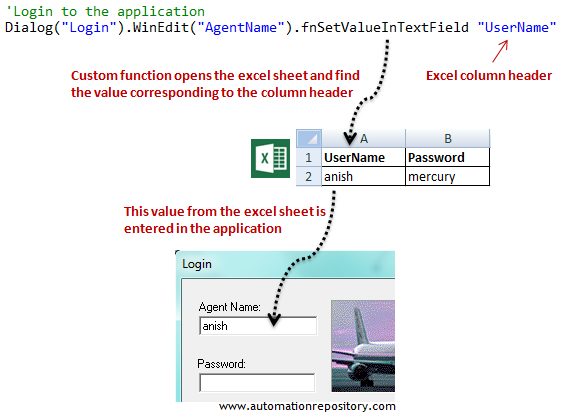
1) The data will be stored in the excel sheet(s).
2) Instead of passing the actual data in the custom function, we will pass the excel column header.
3) The custom function will open the excel sheet and find out the test data with the help of the column header.
4) The function will then set this data (obtained from the excel sheet) in the application.
The below image shows how this new concept would work –
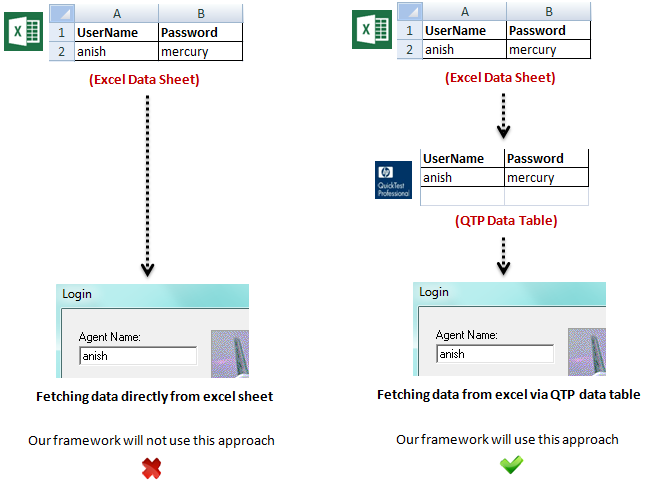
Now, there are various ways in which you can fetch data from excel sheets. And the method that we would use in this framework is this- we will not fetch the data directly from excel sheet. Our custom function will first import the data from excel sheet into QTP data table and then will fetch the actual test data from the data table. This is how it will look like –
For more details on the different ways to fetch data from the excel sheets, you can refer the articles on QTP data driven framework.
Structure of the excel data sheets
The structure of your data sheet plays a very important part in the overall flow of your framework. And this data sheet structure becomes much more important when you are dealing with a lot of test cases (say more than 50 test cases). Also, there would be many other situations (like test cases being data intensive) that decide the structure of your data sheets.
You would have to factor in all these criteria and select the data sheet format that best suites your project and your requirements. We have provided ample examples of different data sheet formats and how they are integrated with the code in data driven and keyword driven frameworks. You can refer those articles to get a better understanding of all those concepts in detail.
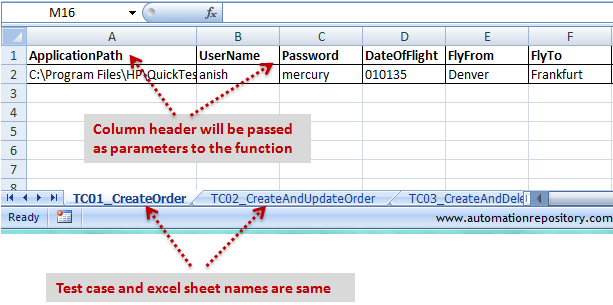
However, in this article, we will try to keep things as simple as possible. And since we are working with only 3 test cases in this framework, we will create the most basic data sheet format. So, the data sheet format/structure that we will be using is as follows –
a) The framework will have 1 excel workbook as the data sheet.
b) Each test case will have its own separate excel sheet within that workbook.
c) So, this framework will use one excel workbook having three excel sheets (one sheet for each test case)
d) The name of each sheet will be same as the test case name. Doing this is important because if you keep the same names for the test case and the data sheet, it will become easier for the automation framework to identify the correct data sheet based upon the test case name.
The below image shows how the data sheet would actually look like.
It is now time start working on the actual code that will fetch the data from the excel workbook.
Actual code to fetch the data from the excel sheets
Let us first see the approach that will be used to fetch the data from the excel sheet.
1) You will create a separate function called fnFetchDataFromExcelSheet(). This is the function that will actually fetch the test data.
2) This function will take an argument which will be the column header of the excel sheet.
3) This function will be added inside other functions that actually set some value in the application. For example, you use fnSetValueInTextField() to enter some value in the application. So our function to fetch the data will be added inside fnSetValueInTextField() function.
4) When you execute your test case, this function will get called. This function will first open the excel workbook and identify the sheet from which the data is to be fetched (the sheet will be identified from the test case name).
5) It will then copy the entire data from the sheet and will load it into QTP data table.
6) Once all the data is loaded into the QTP data table, this function will fetch the actual value by using the column header.
7) Once the value is fetched, it will pass this data to the calling function (like fnSetValueInTextField) which will actually set the data in the application.
To implement this code you have to follow the steps given below –
1) Add the function that will fetch the data from the excel sheet in your function library. If you would have observed, this function is not application specific. It just fetches the data from the excel sheet. And hence, it has got nothing to do with your application. So, you have to save this function in the Generic_FunctionLibrary folder. The code for the function is given below –
'================================================================================
'Function name - fnFetchDataFromExcelSheet
'Description - This function retrieves the data from the excel sheet based upon the column name
'================================================================================
Function fnFetchDataFromExcelSheet(strColumnName)

	Dim sColValue

	'Initialize the return the value to "empty" string
	fnFetchDataFromExcelSheet = "empty"

	'Add a new blank sheet into the QTP data table
	'Excel data will be copied into this blank sheet
	DataTable.AddSheet("dtDataSheet")

	'Import the data from the excel sheet into the QTP data table
	DataTable.ImportSheet sExcelWorkbookPath, sSheetName, "dtDataSheet"

	'Find the value from the data table
	sColValue = DataTable.Value(strColumnName, "dtDataSheet")

	'Return the value back to the calling function
	fnFetchDataFromExcelSheet = sColValue

	'Remove Reference
	DataTable.DeleteSheet("dtDataSheet")

End Function
'================================== End Function ==================================
2) This function uses 2 variables. sExcelWorkbookPath and sSheetName. These variables have to be defined somewhere. To do that, add the following code at the beginning generic function library (the same function library where you added the above function).
Dim sExcelWorkbookPath, sSheetName
sExcelWorkbookPath = "C:\QTP-Hybrid-Framework\DataSheet\TestData.xls"
3) For the above function to work, the test case name should be passed to the function. The code to retrieve the test case name should be added in the main test case. And after adding the code to the main test case, the modified test case will look like this –
'Get the test case name into a variable
sSheetName = Environment.Value("TestName")

fnLogin()
fnCreateOrder()
fnCloseApplication()
4) Now, your function to fetch the data has been implemented. So, the next step would be to add this function call in those functions that actually enter the data in the application. As an example, we have shown how function fnSetValueInTextField() will look like after you have added the code to it.
'================================
'Function name - fnSetValue
'Description - Set value in a text field
'================================
Function fnSetValue(objControl, strColumnName)

On Error Resume Next
Dim sReqdValue

'Get vale from Excel Sheet
sReqdValue = fnFetchValueFromExcelSheet(strColumnName)

'Perform Action
If sReqdValue <> "empty" Then
objControl.Set sReqdValue
Else
Reporter.ReportEvent micFail, "Column - '" & strColumnName & "' Not Found in Data Sheet", "Failed"
End If

'Report out the result
If Err.Number = 0 Then
Reporter.ReportEvent micPass, "Value - '" & sReqdValue & "' entered in Field - '" & objControl.ToString() & "'", "Passed"
End If

End Function
'================================
5) The function call for fetching the data from excel sheets has to be added in all the function that set value in the application. In the framework that we have created till now, there are couple of functions more that perform the set operation on the application. These functions are – fnTypeValueInActiveXField() and fnSelectDropDownValue(). So, you would have to modify these 2 functions in the same way you did for fnSetValueInTextField().
6) Once you have modified all the functions, run the test case once again to verify that it works fine. Try changing the data in the excel sheet and see that the function enters the changed data in the application when you execute the test case.
Important Note: Till now, we have covered how you can implement excel data sheets in your hybrid framework. And to keep things simple, we have taken the simplest structure of excel data sheets – one excel workbook with multiple sheets. But in most of the hybrid frameworks that you will work on, the number of test cases will be quite big (say minimum 50 test cases). And in such a scenario, it is not advisable that you follow the data sheet structure that we have illustrated in this framework.
The best option would be to go through the data driven and keyword driven framework tutorials. From there, you would need to select the format of data sheet that best suites your application and your requirement. The approach on how you fetch the data will remain the same (from excel sheet to QTP data table to application), but the actual code would change a bit.
Adding batch execution features to your framework
Batch execution is a very important feature and is a part of most of the good hybrid frameworks. In fact, if you have an automated test suite with a large number of test cases (be it any type of framework), having an efficient batch execution mechanism becomes a must. Before diving deeper into the details about how you can implement batch execution, let us first start with the basics and see what batch execution actually is.
What is batch execution? Normally when you want to run a test script, you use the “Run” option provided by QTP. What it does is that, it will run the test script that is currently open in QTP. This “Run” option can execute only 1 test case at a time.
But what if you want to run a large number of test cases? Well, one option is that you open each test case one by one and click the Run option for all these test cases. This option can be tried if you have very few test cases with you. But if you have a large number of test cases, then this method is not at all a good option.
While dealing with a large number of test cases, you need a mechanism that can run your test cases effectively with minimum effort. And this is exactly what batch execution does for you. Batch execution is a mechanism that allows you to execute multiple number of test cases (a batch or set of test case) in one go. That is, with one click of a button, you can execute multiple test cases. And this is the reason why batch execution is sometimes referred to as one-click execution.
Different ways to achieve batch execution with QTP
One good thing about QTP is that it provides multiple ways for you to implement the batch execution features in your framework. Depending upon how complex your framework is or whether you use HP Quality Center to maintain your automation framework, you can use any of the batch execution implementations that suites your requirements.
Furthermore, in all the batch execution methods that QTP supports, the basic premise (or approach) remains the same –
a) You have to somehow create a list of test cases. This test case list is called the batch or the test set.
b) From this list of test cases, you should be able to select the test cases that you want to execute. This selection can either be all the test cases or a subset of the test cases.
c) There should be some execute button which, if you click, will run all the test cases that you have selected from the list.
Below, we have listed down the different batch execution methods supported by QTP together with a brief description about each one of them.
1) Using QTP’s Test Batch Runner tool: This is a feature/tool provided by QTP and can be found at Start >> All Programs >> HP Quick Test Professional >> Tools menu. Here you can add all the test cases to the batch and then click on the run button to execute the batch.
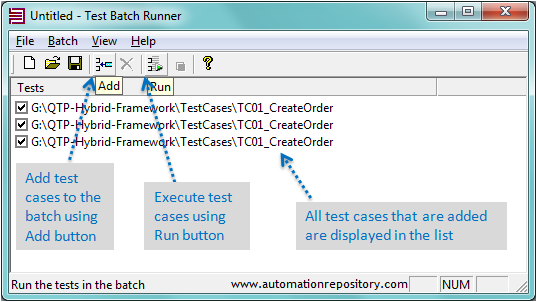
2) Using QC’s test set feature: If you are using Quality Center to store your hybrid framework, then you can create a test set in QC’s test lab. QC provides a run button, which when clicked will execute all the test cases added to that particular test set. This method of batch execution is also very helpful when you use QTP’s BPT framework.
3) Using QTP’s AOM capabilities: This is the most important method using which you can implement batch execution in your QTP framework. QTP AOM, also known as automation object model, is a feature using which QTP exposes its capabilities to the “outside world” in the form of properties and functions. Here, “outside world” refers to different programming/scripting languages like C#, VBA, VBScript etc.
For example, in QTP you have different menu options or shortcuts for doing different tasks, such as opening a test case, running a test case, associating function libraries etc. And normally you would use QTP’s GUI to perform all these actions. But what AOM will do is that it will provide you with different functions that can perform all these tasks programatically. For example, AOM provides a function called “Run” that you can use to execute a given test case. So you can write a program or code that will use this Run function to execute a test case in QTP.
Another good part about AOM is that it can be used with a variety of programming languages. If you are using excel sheets, then you can use AOM in VBA. If you wish to create your own little web portal to drive QTP, you can use C# with AOM.
As part of this hybrid framework, we will be using the QTP AOM method to implement batch execution. The list of test cases to be executed will be maintained in an excel sheet and we will use excel macro (with VBScript + AOM) to execute the test cases in QTP.
Preparing the batch excel sheet
Implementing the batch execution in QTP using AOM is a two-step process. The first step is to create the list of test cases and the second step is to write code that will execute these test cases. In this section, we will focus on the first part, that is, creating the list of test cases in excel sheet. Follow the steps given below to create this test case list –
1) Open a new excel workbook.
2) Make sure that the developed tab is visible in the workbook.

If the developer tab is not visible, then follow the below steps to enable the developer tab. The screenshots given below are from Microsoft Excel 2010. Based upon your version of MS Excel, you would need to figure out the steps accordingly.
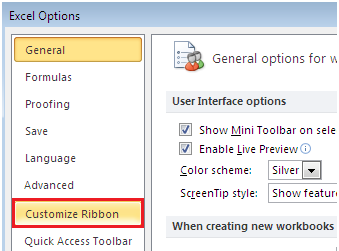
2.1) Select File >> Options.

2.2) Click on Customize Ribbon from the left hand side pane.
2.3) Select the Developer check box from the right-most pane.
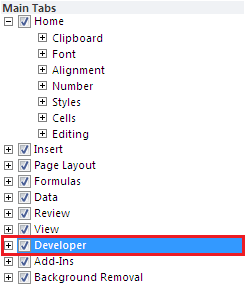
2.4) Click OK. Developer tab should now be available in your excel sheet.
3) In the excel sheet, leave the first row blank. We will add the Execute button in the first row.
4) Starting with the second row, set the column headers and data as shown in the below image.
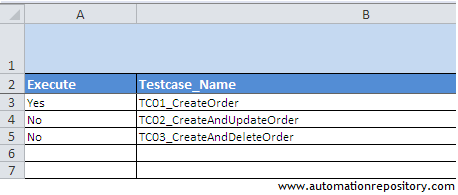
5) Since you currently have only 1 test case in your framework, set Execute as ‘Yes’ for the first test case. For second and third test cases, set the value as ‘No’.
6) Save this file as ‘Batch.xls’ in the Batch folder.
7) Select Developer tab.
8) Click on Insert option in Developer tab and then select the button icon under ‘Form Controls’ section.
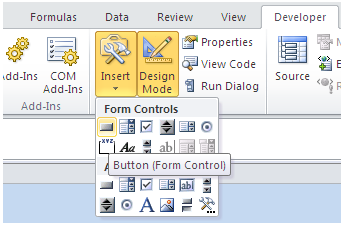
9) Drag the mouse to create a button in the first column of the excel sheet.
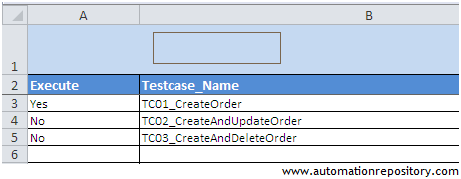
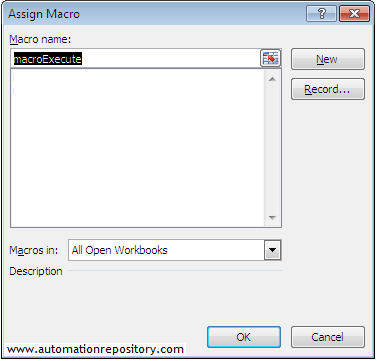
10) In the dialog box that opens up, give a proper name to the macro and click on OK button.
11) The button would now be displayed in the first row. Right click on the button and change its text to ‘Execute’. Change other properties as required.
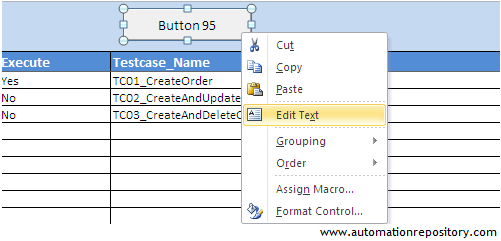
12) Again right click on the button and select ‘Assign Macro’ option.
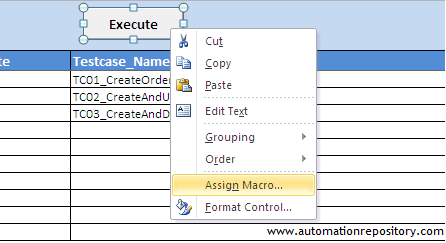
13) Assign Macro dialog box should be displayed as shown below.
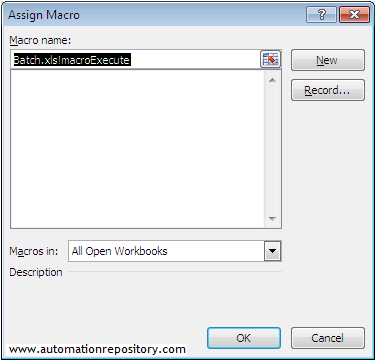
14) Click on ‘New’ button. Upon clicking the New button, a new window will be displayed as given below.
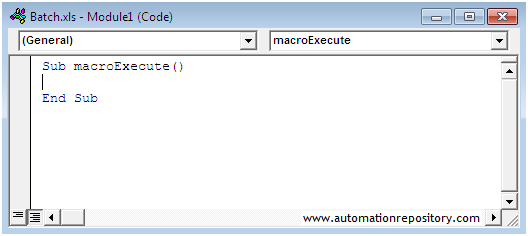
15) Enter the following command inside the Sub function.
Shell "WScript " & """D:\QTP-Hybrid-Framework\Batch\DriverScript.vbs"""
The code in the sub function should now look like this –
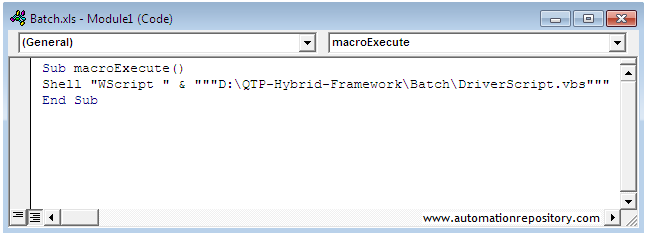
What this means is that when you click on the ‘Execute’ button in the excel sheet, it will pass the control to this sub function. This sub function will in turn execute all the code that is there in DriverScript.vbs file. This DriverScript.vbs file would be the file where you will write the code to execute the test scripts. This coding part is described in the next section.
Adding the code for batch execution
When you use Microsoft Excel as your batch sheet, then you have two ways in which you can implement the coding part. These two ways are –
a.) Writing the code in the macro itself: With this method, you write the code in the excel macro itself. And this code will be written in VBA. Also, since the macro code is a part of MS Excel, you don’t need to create a separate file to write the code.
b.) Writing the code in VBS file: Here, you will create a separate .vbs file and write all the code in it. The excel macro will just be used to call this .vbs file. In this case, coding will be done using VBScript.
Towards the end of the last section (point #15), you would have seen that we have created a separate DriverScript.vbs file. Also in the macro function, we have included a single line of code that just calls this vbs file. What this means is that we are using method b.) to write the AOM code.
Important Note: Even though we have used method b. (using .vbs file) to write the code, you are free to use any of the method that suites you. The only reason we used it this way is that using .vbs file allows us to work with VBScript. And since QTP uses VBScript, we feel more comfortable with VBScript rather than with VBA.
Steps to add the batch execution code: Follow the steps mentioned below to add the batch execution code to your framework.
1) Open a new text file using notepad or any other text editor of your choice
2) Add the following code in this text file. The explanation about the code is added with the code itself in the form of comments
'========== Declare and initialize the variables ==========
Dim sTestCaseFolder, strScriptPath, sQTPResultsPath, sQTPResultsPathOrig

sBatchSheetPath = "D:\QTP-Hybrid-Framework\Batch\Batch.xls"
sTestCaseFolder = "D:\QTP-Hybrid-Framework\TestCases\"
sQTPResultsPathOrig = "D:\QTP-Hybrid-Framework\Results\DetailedQTPResults\"

'========== Create an object to access QTP's objects, methods and properties ==========
Set qtpApp = CreateObject("QuickTest.Application")

'Open QTP if it is already not open
If qtpApp.launched <> True Then
 qtpApp.Launch
End If

qtpApp.Visible = True

'========== Set the run options for QTP ==========
qtpApp.Options.Run.ImageCaptureForTestResults = "OnError"
qtpApp.Options.Run.RunMode = "Fast"

'Set ViewResults property to false. This is because if you run many test cases in batch, you would not want QTP to open a separate result window for each of them
qtpApp.Options.Run.ViewResults = False

' ========== Read test cases from batch excel sheet ==========
Set xl_Batch = CreateObject("Excel.Application")
Set wb_Batch = xl_Batch.WorkBooks.Open(sBatchSheetPath)

'Loop through all the Rows
'1st row contains Execute button, 2nd row is header and the test case list starts from 3rd row. So, For loop is started from 3rd row
For iR = 3 to 1000

 'Get the value from the Execute column
 If xl_Batch.Cells(iR, 1).Value = "Yes" Then

 'Get Test Case Name
 sTestCaseName = xl_Batch.Cells(iR, 2).Value

 'Get the location where the test case is stored
 strScriptPath = sTestCaseFolder & sTestCaseName

 'Open the Test Case in Read-Only mode
 qtpApp.Open strScriptPath, True
 WScript.Sleep 2000

 'Create an object of type QTP Test
 Set qtpTest = qtpApp.Test

 'Instruct QTP to perform next step when error occurs
 qtpTest.Settings.Run.OnError = "NextStep"

 'Create the Run Results Options object
 Set qtpResult = CreateObject("QuickTest.RunResultsOptions")

 'Set the results location. This result refers to the QTP result
 sQTPResultsPath = sQTPResultsPathOrig
 sQTPResultsPath = sQTPResultsPath & sTestCaseName
 qtpResult.ResultsLocation = sQTPResultsPath

 'Run the test. The result will automatically be stored in the location set by you
 WScript.Sleep 2000
 qtpTest.Run qtpResult

 ElseIf xl_Batch.Cells(iR, 1).Value = "No" Then
 'Do nothing. You don't have to execute the test cases marked as No

 ElseIf xl_Batch.Cells(iR, 1).Value = "" Then
 'Blank value means that the list of test cases has finished
 'So you can exit the for loop
 Exit For

 End If

Next
3) Save this text file as DriverScript.vbs. Make sure that the file is saved with .vbs extension only and not as DriverScript.vbs.txt. Also make sure that the path mentioned in the excel macro function (point #15 in the previous section) is the same place where you save this vbs file.
4) Open the batch excel sheet. Make sure that the first test case is selected as ‘Yes’. And the remaining two test cases are marked as ‘No’. Also, go to Developer tab and check that the ‘Design Mode’ option is unselected.
5) Now, its time to verify if batch execution feature has been properly implemented or not. To do this, click on the Execute button. If everything is working fine, the driver script will load the first test case in QTP and will execute the test case.
Now, you will have a hybrid framework that can execute a single test case in batch mode. Also, your hybrid framework has the features of modular and data driven frameworks implemented in it. So, at this stage, you can say that you have set up a hybrid framework with most of the important features in it. :–)
Final article on QTP Hybrid Framework
The next article would be the final one on QTP hybrid framework series. That article would cover the remaining topics about implementing the reporting and auto-email features. Moreover, we will publish the entire framework code (with all the 3 test cases) in the next article.
Till then, if you have any comments about this article, you can let us know about it using the comments section.
If you enjoyed this article, you can join our blog to get new articles delivered directly in your inbox.
Visit QTP Frameworks Main Page for more articles on QTP Frameworks. You can also visit our QTP Tutorials page for detailed QTP Tutorials.


Pingback: Designing Hybrid Framework in QTP - Part 4 [Final Part] - Automation Repository - Automation Repository()
Pingback: Looping values from excel sheet in UFT | Alycia()