Designing Keyword Driven Framework mapped at Functional Level – Part 2
Till now, we have covered many aspects of the Keyword Driven Framework in detail. This would be the last article of the Keyword Driven Framework series. In this article, we will see the actual implementation of the Keyword Driven Framework mapped at functional level (for more information about the design aspects of this framework, refer the previous article from this link – Keyword Driven Framework mapped at Functional Level – Part 1).
UPDATES
1) You are free to download and play around with the code used for this framework. The download link is available at the end of the article.
2) Just like this, we have written more articles on various other QTP Frameworks. If you wish to have a look at those, please visit QTP Framework main page. The bottom of the page contains links to other QTP Frameworks.
Topics that will be covered in this article
We will be covering the following topics in this article –
1) Identifying the components that will be used in this framework.
2) Identifying the test cases that will be automated as part of this framework.
3) Describing the process which would be used to write test scripts in this framework.
4) Enhancements/Improvement points for the framework.
Let us now see each of these topics one by one.
Components that will be used in this Framework
Following are the components that we will use to create this framework from scratch.
1) QTP Test Scripts (or QTP Actions): As part of this framework creation, we will be automating 3 test cases. And for each of these test cases, we will create a separate QTP Test Script.
2) Function Library: There will be 2 function libraries that will be created for this framework. The first function library will contain all the functions that are related only to the framework (and not to the application). The second function library will contain the functions that will contain the functions related to the application.
3) Object Repository: For this framework, we will use the Object Repository to store the object properties. Descriptive Programming will not be used anywhere in this framework.
4) Excel Sheet to Store Test Case Flow: We will be using a single excel workbook (and a single excel sheet in the workbook) to store the flow of all the 3 test cases.
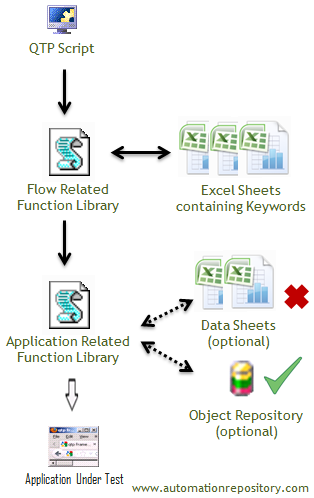
Above mentioned are the 4 major components that will be used in this automation framework. Please note that the data for the test cases will be hard-coded in the test scripts only. Separate excel sheets will not be created to store data. The below figure shows the components and their flow.

Test Cases that will be automated for this Framework
For this framework, we will be working on the same test cases that were automated for Keyword Driven Framework mapped at Operation Level. The 3 test cases are –
1) TC_01_CreateOrder: For this test case, we will write a script that will login to Mercury Flight Reservation system and then create a new flight reservation.
2) TC_02_ModifyOrder: In this test case, the script will log in to the application, open an existing order and then modify the order.
3) TC_03_DeleteOrder: Here, the script will again log in to the application, open an existing order and then delete the order.
Step By Step Method to Automate the First Test Script
In this article, we will cover the creation of first test script in detail. And this test script will be created as per the framework specifications. Once you understand the underlying concepts used for creating the first script, you can use the same concepts to script the remaining test cases.
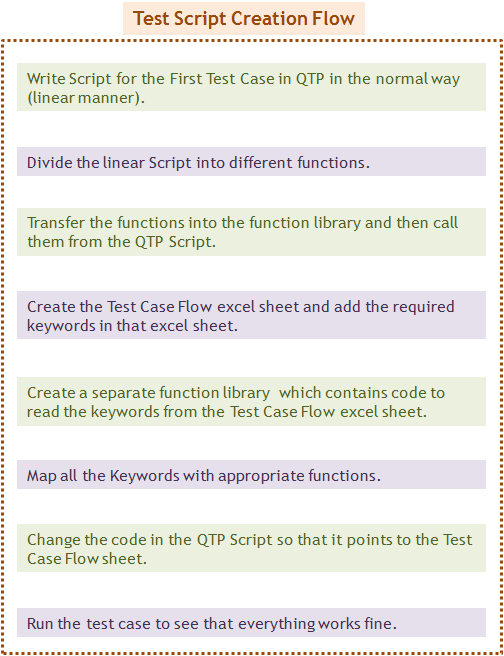
The below image depicts the basic steps which we will use to script the first test case from scratch.

Let us now cover each of these points in detail.
Step 1: Creating the First Test Script in QTP in Linear Manner
The first step would be to create the entire test script in the normal way (i.e. in the linear manner). For this, you can follow the steps mentioned below.
Step 1A: Open a new Test Case in QTP.
Step 1B: Navigate to Resources -> Object Repository Manager to open a new Object Repository.
Step 1C: Open the Flight Reservation Application (windows version) from Start -> All Programs -> QuickTest Professional -> Sample Applications -> Flight (this path may differ depending upon the OS and QTP Versions)
Step 1D: Add all the necessary objects (that are required for order creation) in the Object Repository.
Step 1E: Associate the Object Repository with the Test Script.
Step 1F: Once the Object Repository has been associated with the Test Script, write the script to insert a new order in the flight reservation system.
Step 1G: Run the script to verify that the code is working fine.
The code you have written to insert a new order in Flight Reservation System will look similar to the code shown below.
'===== Code to Login to the Application =====
SystemUtil.Run "C:\Program Files (x86)\HP\QuickTest Professional\samples\flight\app\flight4b.exe"
Dialog("Login").WinEdit("AgenName").Set "anish"
Dialog("Login").WinEdit("Password").Set "mercury"
Dialog("Login").WinButton("OK").Click

'===== Code to Insert a New Order =====
Set WshShell = CreateObject("WScript.Shell")
WshShell.SendKeys "%(fn)" 'Press Alt F+N to open new order screen
Window("Flight Reservation").ActiveX("DateOfFlight").Type "010114"
Window("Flight Reservation").WinComboBox("FlyFrom").Select "Paris"
Window("Flight Reservation").WinComboBox("FlyTo").Select "Sydney"
Window("Flight Reservation").WinButton("Flights").Click
'Select any Flight
Window("Flight Reservation").Dialog("FlightsTable").WinButton("OK").Click
'Provide Name and Insert Order
Window("Flight Reservation").WinEdit("Name").Set "Anish"
Window("Flight Reservation").WinButton("InsertOrder").Click

'===== Logout from Application =====
Window("Flight Reservation").Close
If your code to Insert New Order in Flight Reservation Application is running fine, then you have accomplished the first task. You now have the basic script that can insert a new order. Now all your remaining steps would focus on how to modify this script and fit it into the framework.
Step 2: Dividing the Script into Different Functions and calling them from the Test Script
In the previous step, you had created the test script in linear fashion. Now in this step, you would need to convert the linear flow into different functions and then call the same from the test script. To do this, you have to follow the steps mentioned below –
Step 2A: First Step is to identify the functions which should be created from the linear flow. One look at the test case, and you would get to know that the test case can be divided into 3 flows or functions. These are – Login, Insert Order and Logout.
Step 2B: Create 3 different functions in the Test Case and then cut paste the appropriate code in all the 3 functions. Example, the Login function will contain the code to login to the application.
Step 3B: Once all the functions have been created, call these functions from the test script itself. The code in the QTP test script should look something like this –
' - - Test Case Flow - -
fnLogin()
fnInsertOrder()
fnLogout()

'========================================
'   Function Name - fnLogin
'   Purpose - This function is used to login to flight reservation application
'========================================
Function fnLogin()

	SystemUtil.Run "C:\Program Files (x86)\HP\QuickTest Professional\samples\flight\app\flight4b.exe"
	Dialog("Login").WinEdit("AgenName").Set "anish"
	Dialog("Login").WinEdit("Password").Set "mercury"
	Dialog("Login").WinButton("OK").Click

End Function

'========================================
'   Function Name - fnInsertOrder
'   Purpose - This function inserts a new order in flight reservation application
'========================================
Function fnInsertOrder()

	Set WshShell = CreateObject("WScript.Shell")
	WshShell.SendKeys "%(fn)" 'Press Alt F+N to open a new order screen
	Window("Flight Reservation").ActiveX("DateOfFlight").Type "010114"
	Window("Flight Reservation").WinComboBox("FlyFrom").Select "Paris"
	Window("Flight Reservation").WinComboBox("FlyTo").Select "Sydney"
	Window("Flight Reservation").WinButton("Flights").Click
	'Select any Flight
	Window("Flight Reservation").Dialog("FlightsTable").WinButton("OK").Click
	'Provide Name and Insert Order
	Window("Flight Reservation").WinEdit("Name").Set "Anish"
	Window("Flight Reservation").WinButton("InsertOrder").Click

End Function

'========================================
'   Function Name - fnLogout
'   Purpose - This function is used to logout from the flight reservation application
'========================================
Function fnLogout()

	Window("Flight Reservation").Close

End Function
Step 2D: Run the code to verify that it is working fine.
In the beginning of the article, we had mentioned that we will be creating 2 function libraries in this framework. And one of these function libraries will be used to store the test case flow. So now, we will create a function library and then move the functions from the test script to this function library. This will be the function library that will contain the application related code.
Step 2E: Create a new function library and save it at an appropriate location.
Step 2F: Associate this function library to the QTP Test Script.
Step 2G: Cut paste the functions from the test script to the function library.
Now at this step, the function library will contain all the 3 functions and the test script will contain the function calls for all these 3 functions. The code in the test script and the function library will look something like this –
* * * * * Code in QTP Test Script * * * * *
fnLogin()
fnInsertOrder()
fnLogout()
* * * * * Code in Application Related Function Library * * * * *
'========================================
'   Function Name - fnLogin
'   Purpose - This function is used to login to flight reservation application
'========================================
Function fnLogin()

	SystemUtil.Run "C:\Program Files (x86)\HP\QuickTest Professional\samples\flight\app\flight4b.exe"
	Dialog("Login").WinEdit("AgenName").Set "anish"
	Dialog("Login").WinEdit("Password").Set "mercury"
	Dialog("Login").WinButton("OK").Click

End Function

'========================================
'   Function Name - fnInsertOrder
'   Purpose - This function inserts a new order in flight reservation application
'========================================
Function fnInsertOrder()

	Set WshShell = CreateObject("WScript.Shell")
	WshShell.SendKeys "%(fn)" 'Press Alt F+N to open a new order screen
	Window("Flight Reservation").ActiveX("DateOfFlight").Type "010114"
	Window("Flight Reservation").WinComboBox("FlyFrom").Select "Paris"
	Window("Flight Reservation").WinComboBox("FlyTo").Select "Sydney"
	Window("Flight Reservation").WinButton("Flights").Click
	'Select any Flight
	Window("Flight Reservation").Dialog("FlightsTable").WinButton("OK").Click
	'Provide Name and Insert Order
	Window("Flight Reservation").WinEdit("Name").Set "Anish"
	Window("Flight Reservation").WinButton("InsertOrder").Click

End Function

'========================================
'   Function Name - fnLogout
'   Purpose - This function is used to logout from the flight reservation application
'========================================
Function fnLogout()

	Window("Flight Reservation").Close

End Function
Step 2H: Run the code and make sure that everything runs fine.
Once this step is finished successfully, you will have the script that is made up of separate functions. At this point, you can see that the flow of the test case is defined in the QTP Test Script. (All the functions are being called from the QTP Test Script and therefore the flow of the test cases is available in the QTP test script only)
The next step would be to create a Test Case Flow excel sheet where we will add all the keywords associated with the test case. By doing this, the flow of the test case will be dictated by the test case flow excel sheet. Let’s see how this can be done.
Step 3: Creating a Test Case Flow Excel Sheet and mapping it with the Test Script
In this step, we will create a test case flow excel sheet and then add the keywords that have been identified for the test case. Then we will write code that will read the keywords from the excel sheet call the functions associated with the test cases. You can follow the below mentioned steps to perform the above task.
Step 3A: The first step is to identify the keywords that will be associated with our test case. Looking at the functions that we have come up with in the previous step, we can have the following keywords which we can associate with the script –
- login – To login to the application
- InsOrd – To insert a new order into the application
- logout – To logout from the application
Step 3B: Once the keywords have been identified, the next step is to add the keywords in the excel sheet. Create a new excel sheet and add keywords to it as shown in the below image. Save the excel sheet by giving some appropriate name.

Now we have to write the code that will fetch the keywords from the excel sheet and call the associated function. The code to fetch open the excel sheet and fetch the keywords is the generic code that is independent of the application. This is because even if you have some other application, the only change here would be the name of the test case, the keywords and the description.
No matter what the keywords are, the code to fetch them would remain the same. So, the functions that we would write here would go to a separate function library (framework related function library). This way you would be able to keep the generic and application specific code separate.
Step 3C: Create a new function library where you will store the framework specific code. For this framework, we will name this function library as ‘FrameworkRelatedFunctionLibrary’. Associate this function library with the test script.
Step 3D: You have to now write the function that will read the keywords from the excel sheet. Below is the sample code that shows how this can be done.
'========================================
'   Function Name - fnReadKeywords
'   Purpose - This function reads the keywords that are associated to a given test case
'========================================
Function fnReadKeywords(sTCName)

	'Add a new Sheet into QTP Data Table
	DataTable.AddSheet("dtTCFlow")

	'Import the Excel Sheet into QTP Data Table
	DataTable.ImportSheet sExcelLocation, "TestCaseFlowSheet", "dtTCFlow"

	'Loop through all the rows in the Data Sheet
	iRow = DataTable.GetSheet("dtTCFlow").GetRowCount

	For iR=1 to iRow
			'Set the Current Row in the Data Sheet according to the loop counter
			DataTable.SetCurrentRow iR

			'Capture the Keyword based upon the test case name
			If DataTable("TestCaseName", "dtTCFlow") = sTCName Then
					'Call the executeFlow function that will execute the function associated to the keyword
					 executeFlow DataTable("TestCaseFlow", "dtTCFlow")
			End If
	Next

End Function
The above function opens the excel sheet, loads its contents into QTP Datatable and then reads the keywords that are associated to the given test case. Once it identifies the keyword, it passes the keyword to a different function which then executes the actual function associated with this keyword.
Step 3E: The next step is to map the keywords with the actual flow functions so that whenever a keyword is encountered, the matching function can be executed. We will create a separate function where will define the mapping in a Select Case statement. Since this function is dependent on the application, we will store this function in the application related function library. Below you can see how this function has been implemented for the first test case.
'========================================
'   Function Name - executeFlow
'   Purpose - This function executes the functions that are associated to the given keyword
'========================================
Function executeFlow(flowName)

	'Call the function associated with the keyword
	Select Case flowName
		Case "login"  fnLogin()
		Case "insOrd" fnInsertOrder()
		Case "logout" fnLogout()
	End Select

End Function
Now the final part that is pending is to call the above functions from the test script. If you recall, the main test script currently contains the flow of the test case. But now, since the flow has been defined in the test case flow excel sheet, we can remove the previous function calls from the main test script.
We can now just call the fnReadKeywords() function from the main script. Once the function has been called it will do its job and execute all the functions that are associated with the keyword.
Step 3F: Open the main QTP Test Script. Delete the function calls that are written there and write the new code that will call the fnReadKeywords() function and pass the test case name as the parameter. The code for that will look similar to the one shown below.
sTestCaseName = Environment.Value("TestName")
fnReadKeywords sTestCaseName
Step 3G: Execute the test case and see if it is running fine.
Once you verify that the test case is running fine, you will have with you the working model of a basic Keyword Driven Framework where the keywords are mapped at function level. Now you can easily add more test cases to this framework by following the steps mentioned above.
The entire framework together with the function library and flow for all the 3 test cases is available in the sample framework. You can download this framework (link available near the bottom of the article) and play around with the code.
Improvements in the Framework
As mentioned in the beginning of the article, this is a very basic framework that will just contain the basic things to help you understand the concepts easily. You can try to improve this framework by adding more features to it. This would make the framework more robust and easy to use and maintain. This would also work as a practice exercise for you and would help you learn more stuff.
Please note that these changes or improvements are not available in the attached framework. This is just a practice exercise which you can try from your end.
Improvement 1) Currently, the test case flow just contains the TestCaseName, Keywords and Description only. You can try to add an additional Column where you can store the result as ‘Pass’ or ‘Fail’ for each keyword. You would also need to write some code which after executing every function, will update this column as ‘Pass’ or ‘Fail’. This will help you keep a track of the results easily.
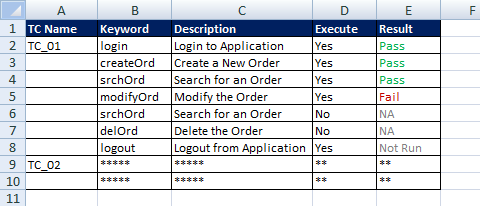
Improvement 2) You can add one more additional column which will tell QTP whether the particular flow has to be executed or not. The column can have values as ‘Yes’ or ‘No’. Once QTP encounters a keyword, it will first check this column and then execute the function associated with the keyword only when the column contains the value ‘Yes’.
After implementing the above 2 enhancement points, the test case flow excel sheet would look something like this.

Improvement 3) You would also have observed that the data is hard-coded with the flow. Because of this, if you want to run the flow for multiple data, you would need to change the data values before each run. To avoid this, you can try to separate the data from the flow by adding it to a separate excel sheet. This way you would be able to change the data without touching the flow and you can also re-run the same flow multiple times by using a loop.
Try out these changes and let me know if you face any issues in-between. If you have any points to add here, or if you have any other improvement which can be added in this framework, please let us know about it using the comments section.

If you enjoyed this article, you can join our blog to get new articles delivered directly in your inbox.
Visit QTP Frameworks Main Page for more articles on QTP Frameworks. You can also visit our QTP Tutorials page for more QTP Tutorials.


Pingback: QTP Framework Tutorials - Framework Types, Examples & Code Snippets - Automation Repository()
Pingback: razor()