UFT Keyword Driven Framework mapped at Operation Level – Part 2
In the previous article on Keyword Driven Framework mapped at Operation Level, we covered the basic features of the UFT keyword driven framework that we would be creating here. The article contained information about the components that can be used in this framework as well as the general flow of the test cases. In this article, we will actually implement all this and come up with a basic keyword driven framework.
UPDATES
1) You are free to download and play around with the code used for this framework. The download link is available at the end of the article.
2) Just like this, we have written more articles on various other QTP Frameworks. If you wish to have a look at those, please visit QTP Framework main page. The bottom of the page contains links to other QTP Frameworks.
What we would be doing in this article
1) In this article, we will create the keyword driven framework with 3 test cases. All these 3 test cases will be based on Mercury Flight Reservation application (windows based application).
2) The flow of the test cases will be written in the excel sheets. The data for the test cases will also be provided with the flow only.
3) A function library will be created which will contain the code to read the lines from excel and convert in into QTP recognizable format.
4) Towards the end of the article, we will list out few enhancements/improvements which you can try to implement in the framework on your own. This will really help you practice the concepts and get a good hold on the framework.
Identifying the Test Cases for this Framework
Before beginning with the framework creation part, the first step would be to identify the test cases that you want to automate. For this article, we will be working on the following 3 test cases.
1) TC_01_CreateOrder: For this test case, we will write the script that will login to Mercury Flight Reservation system and then create a new flight reservation.
2) TC_02_ModifyOrder: In this test case, the script will log in to the application, open an existing order and then modify the order.
3) TC_03_DeleteOrder: Here, the script will again log in to the application, open an existing order and then delete the order.
Step by Step method to create the First Test Case
As always, the hardest part is to begin with the first step. Once that is done, the remaining portions become relatively easier to do. So in this article, we will describe how to create the first test case in detail. Once you are comfortable writing the first test case, the remaining ones will be fairly easy to tackle.
Writing test cases in this framework can be divided into 3 main parts:
Step 1) Writing the test case flow in excel sheet.
Step 2) Writing functions in the function library that will read the excel sheet.
Step 3) Combining Steps 1 and 2 to run the test case.
Let’s see each of these steps one by one.
Step 1-A: The first step would be to define the format of the excel sheet that will be used to store the flow of the test cases. You would need to create a format and stick with it for all the test cases.
To create the excel sheet format that we will be using here, open an excel sheet and add the values as shown in the below figure.

Step 1-B: Let’s now have a look at this format in detail and see what different columns mean and what kind of data will go in each of these columns.
Parent [Column A] – This column will contain the hierarchy of all the objects until the actual control on which you want to perform some operation. For example, consider the below statement –
Browser(“B”).Page(“P”).Frame(“F”).WebEdit(“W”).Set “some value”
Here, WebEdit(“W”) is the object on which you will perform the operation. So the hierarchy before it would be: Browser – Page – Frame. So Column A will contain the value Browser,Page,Frame
Please note that Column A will only list the Object names and not there properties. Also, the object names are separated by the delimiter comma (,)
PProperty [Column B] – This column will contain the properties of the objects that were added in Column A. The properties will also be separated by comma (,). Also, the property of an object is usually a name value pair. The name and value will be written as is it done in case of descriptive programming. So as per the above example, column B can have text like – title:=B,title:=P,name:=F
Control [Column C] – Column C will contain the name of the control on which you want to perform the operation. In this example, the control is WebEdit(“W”) on which you want to perform the Set operation. So Column C will contain the value WebEdit. Since there will always be only one object on which you will need to perform some operation, so there would be no hierarchy of objects in this column.
CProperty [Column D] – Column D will contain the property that is associated with the object in Column C. Here let use assume that the WebEdit has ‘W’ as its name. So, the value in Column D would be name:=W
Action [Column E] – This column stores the name of the action that needs to be performed on the object. This action or operation will be the keyword that will be mapped to some appropriate operation in the function library. In our example, the action that needs to be performed is Set. So we can use a keyword SetValue to denote this action. So column E will contain the value SetValue
Data [Column F] – In this column, you will be providing the data that goes with the action. For example, for Set action, we will need to provide the data that will be entered in that particular field. In this case, the value that will go to Column F is ‘some value’ (without ‘ ‘).
Also, there will be certain cases where there would be no data requirement. For example, click operation on a button. In this case, you just need to click on the button, there is no data that needs to entered anywhere. So in such cases Column F will be empty.
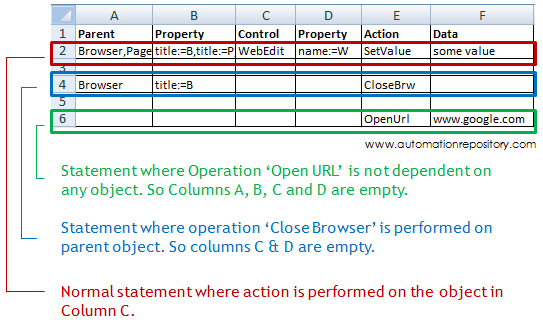
The below image shows how the flow will look in excel sheet for the sample sheet covered here.

NOTE 1: There would be certain cases where you would need to perform operation on the parent object only. For example, you may want to close the parent window. Here, this close operation will be performed on the parent object. So in such cases, columns C and D will be empty. Only Columns A and B will be filled in with values to identify the parent object.
NOTE 2: There will also be certain cases where the operation would not be performed on any object. For example – SystemUtil.Run statement. This statement doesn’t work on any object, neither parent nor child. So in such cases, Columns A, B, C and D will be empty. Only column E will have some value which will depict the operation that needs to be performed.
The below image will make these two points more clear.

Step 1-C: Since you have understood the structure of the test case flow excel sheet, we can now start writing the flow of the test case in the excel sheet. You can follow the below mentioned steps to start with the process.
1) Open QTP. Since we will be working on a windows based application, you can deselect the Web Add-in from Add-in Manager at start-up. (If you need more information about QTP Add-in manager, you can check how to enable/disable Add-in Manager and how to install/uninstall other add-ins).
2) Once QTP is opened, open the ‘Mercury flight reservation application’, so that the login screen of the application is displayed.
3) Now whatever actions we have to perform in the application, we have to capture it in the excel sheet. As an example, we will just work on the login portion of the application where we will enter Agent Name, the Password and then we will click on OK button. Once this is done, we will close the main window of the application.
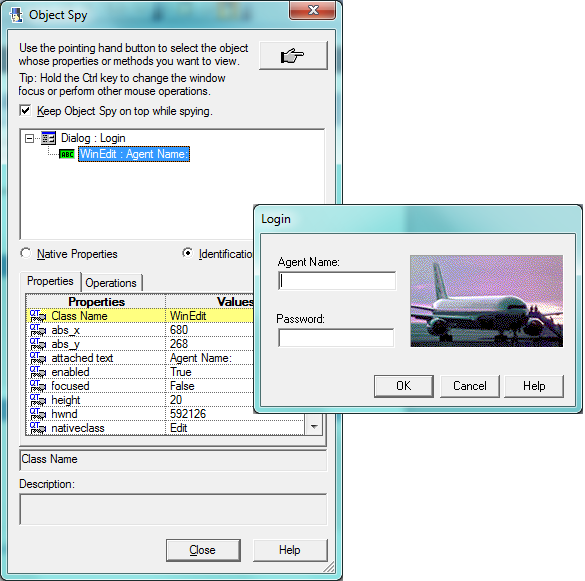
4) To capture the object properties, we will use the Object Spy. Open object spy and click on the Agent Name field. Once you spy on the Agent Name field, you would note that the hierarchy in the Object Spy window consists of 2 elements – Dialog and WinEdit (image shown below). And from the structure of the excel sheet that we mentioned above, it can easily be made out that the object Dialog with its properties would go in columns A and B, and the object WinEdit and its properties will go in columns C and D. The action that we would need to perform here is Set.

5) Have a look at the properties of both the controls and select the ones that you think will uniquely identify both the objects. Add the objects and the properties in the excel sheet in the 2nd row (just below the header).
NOTE 3: If you are not comfortable with this process of identifying the properties using Object Spy, you can follow an alternate method where you can first record the scenario in QTP. Then you can go to local Object Repository and select the values that have been used by QTP. Once you start working with this approach, you will be able to work real quickly with the Object Spy because you would get an idea about the properties that usually go with different types of objects.
6) Once you have added the values for Agent Name field in the excel sheet, you can follow the same process to add the values for entering values for password field and OK button. Once you are done with all these steps, you would have an excel sheet that would look similar to the image below (the properties of the objects may change based upon what values you have selected to use).

You would have noted that we have added the word End in the 6th row. This End word indicates to QTP that the test case has ended here. So when QTP encounters this keyword, it will stop processing this test case. We have also added Run command in Row 2. This command will instruct QTP to open the flight reservation application.
Since we have written the flow of the login portion in the excel sheet, we can leave it at this step for the time being and start concentrating on the next part which is – writing code or functions in the function library that will read the excel and convert it into QTP readable format. The idea here is that we will create the necessary functions and then run the script for the 5-6 lines you have written in the excel sheet. Once you are able to run the excel statements from QTP, you can be sure that the logic is working fine. Then you can just add on the steps in the excel sheet and run everything from QTP.
Step 2) Writing functions in the function library that will read the excel sheet. Now there are multiple categories of functions that you will need to write here. Let’s see what are these different categories of functions –
a) Category 1: Function(s) that will be used to open or connect to the excel sheet.
b) Category 2: Function(s) that read each line in the excel and convert it into QTP readable format.
c) Category 3: Function(s) that do some action on the application. Like click on button, set value in some text field etc.
d) Category 4: Function(s) that will call the Category 3 functions based upon the keyword in the excel sheet.
Before writing the functions, make sure that you create a function library and associate it with your QTP Test Case. Once this is done, you can start writing these functions one by one. Below we have covered few of these functions which will help you understand the logic.
1) Function that reads the excel sheet and loads the cell values into Global Variables. We are using global variables because the variables are being used in multiple functions. (To read more about global variables, you can read – Different ways to define Global Variables in QTP)
'========================================
'	Function Name - fnReadExcel
'	Purpose - This function loads the excel sheet into QTP data table and stores the cell values in Global Variables
'========================================
Function fnReadExcel(sSheetName)

	 	'Add the Data Sheet into QTP Data Table
		DataTable.AddSheet("dtSheet")

		'Import the Excel Sheet into QTP Data Table
		DataTable.ImportSheet sExcelLocation, sSheetName, "dtSheet"

		'Loop through all the rows in the Data Sheet
		iRow = DataTable.GetSheet("dtSheet").GetRowCount

		For iR = 1 to iRow
				'Set the Current Row in the Data Sheet according to the loop counter
				DataTable.SetCurrentRow iR

				'Capture all the cell values in different variables
				sParent = DataTable("Parent", "dtSheet")
				sParentProp = DataTable("PProperty", "dtSheet")
				sControl = DataTable("Control", "dtSheet")
				sControlProp = DataTable("CProperty", "dtSheet")
				sAction = DataTable("Action", "dtSheet")
				sDataValue = DataTable("Data", "dtSheet")

				'Call the function that will convert the excel data into QTP readable format
				If sParent = "End" Then
						Exit For
				ElseIf sParent <> "" Then
						fnIdentifyParentHierarchy()
				Else
						'The action is independent of the all the controls (refer NOTE  2 from the article)
						fnAction()
				End If

		Next

End Function
'============= End Function ===============
2) The below function converts values from columns A and B of the excel sheet into QTP readable format.
'========================================
'	Function Name - fnIdentifyParentHierarchy
'	Purpose - This function converts the values in cells A and B into QTP readable format
'========================================
Function fnIdentifyParentHierarchy()

	 	'Split Parent Property so that multiple objects casn be resolved
		arrParentProp = Split(sParentProp, ",")

		'Resolve the hierarchy of all the objects that are parent to the actual control
		Select Case sParent

				Case "Dialog"
						Set obj_hierarchy = Dialog(arrParentProp(0))

				Case "Window"
						Set obj_hierarchy = Window(arrParentProp(0))

		End Select

		'Call the function that will resolve the Control Object
		fnIdentifyControl()

End Function
'============= End Function ===============
3) This function converts data from cell C and D in QTP readable format. Later, it combines values in Cells A, B, C and D to form one complete object on which the action will be performed.
'========================================
'	Function Name - fnIdentifyControl
'	Purpose - This function converts the values in cells C and D into QTP readable format and then combines values from Cells A, B, C and D to come up with a single object
'========================================
Function fnIdentifyControl()

		'Split the Control Property
		If sControl <> "" Then
				arrControlProp = Split(sControlProp, ":=")

				'Resolve the Control object to obtain the complete heirarchy on which the action can be performed
				Set child_object = Description.Create()
				child_object("micclass").value = sControl
				child_object(arrControlProp(0)).value = arrControlProp(1)

				'Create the object on which the action will be performed
				Set control_object = obj_hierarchy.ChildObjects(child_object)
		Else
				'Control Object is the parent hierarchy on which the action will be performed (refer NOTE 1 from the article)
				Set control_object = obj_hierarchy
		End If

		'Call the function that will perform the necessary action on the object
		fnAction()

End Function
'============= End Function ===============
4) The below function performs Actions or Operations on the object which is retrieved from the previous function.
'========================================
'	Function Name - fnAction
'	Purpose - This function performs action on the object based upon the defined keyword
'========================================
Function fnAction()

		'Perform Action on the control_object based upon the keyword defined in the excel sheet
		Select Case sAction

				Case "SetValue"
						control_object(0).Set sDataValue

				Case "Click"
						control_object(0).Click

				Case "WindowClose"
						control_object.Close

				Case "Run"
						SystemUtil.Run sDataValue

		End Select
End Function
'============= End Function ===============
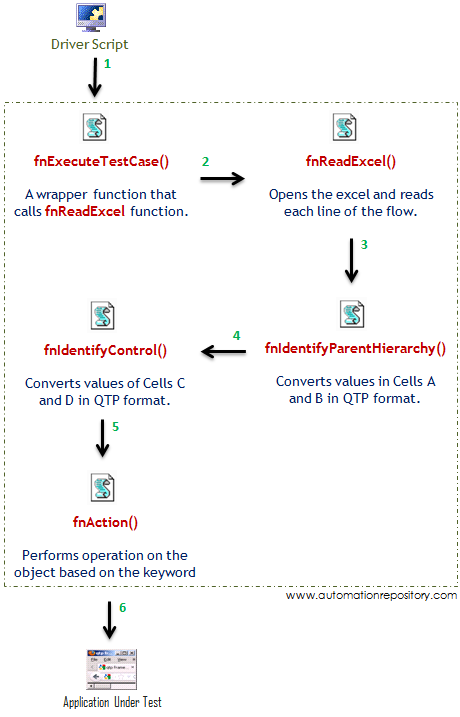
Please don’t worry much if you don’t understand the code and functions at this point in time. Once you have a look at the entire framework, you will get a fairly good idea about the functions and how they interact with each other. For ease of understanding, you can check the below image which shows the low level flow of a test case as per this framework.

The good part of this framework and the function library is that you would need to work more on the functions and the code in the initial part only (when you are beginning to develop the framework). As and when you add new code in the function library, you will be able to reuse it for similar type of objects and hence the time taken to write the later test cases will be greatly reduced.
As an example, you can see that the functions SetValue, Click etc are already written in the function library. Now, if you want to use these functions for any other text box, button or link, you would just need to call the keyword in the excel sheet. The more you work on this framework, there would come a time when you would mostly need to write the flow in the excel sheet only. Most of the keywords would already have been covered in the function library.
Once we have written the basic functions for running the script from excel sheets, we need to combine everything together and run the code to see if it works.
Step 3) Combining Steps 1 and 2 to run the test case. To combine everything together, you need to create a proper framework with the folder structure, save the function library and the excel sheet in appropriate locations. Now you should create a QTP Test Case (which will act as a driver script in this case). Associate the function library with the test case and call appropriate functions that will run the test case. (You can check the folder structure and other details from the sample framework attached at the end of this article)
In this example, we have called the function fnExecuteTestCase() in the Driver Script and passed the test case name as a parameter to this function. This function is nothing but a wrapper function which gives a call to fnReadExcel() function. Since the test case name and sheet names are same, the function fnReadExcel will call the appropriate sheet and execute the flow provided in the excel sheet.
'Code in Driver Script

'Execute --> TC_01_CreateOrder
fnExecuteTestCase("TC_01_CreateOrder")
Run the test case to see if the code is running correctly. Once you have verified that the code is running fine, you can then keep on adding the flow in the excel sheet and add corresponding keywords in the function library. Just make sure that whenever you encounter a new keyword, you have to add it in the excel sheet and write corresponding action in the function library. This way you would be able to create all the 3 test cases easily without any issues.
The entire sample framework together with the function library and flow for all the 3 test cases is available in the sample framework. You can download this framework (link available near the bottom of the article) and play around with the code.
Can you Improve this Keyword Driven Framework?
Have you read this article and tried to work on the sample keyword driven framework attached here? Have you understood all the functions and the entire flow of test cases in this framework? If yes, then you can try to improve this framework by adding more features to it. This would make the framework more robust and easy to use and maintain. This would also work as a practice exercise for you and would help you learn more stuff.
Since this is a basic framework created to just help you understand the basics, there are many things which are not covered as part of this framework. I would list down the points here and you can try to modify the framework by incorporating these changes. Please note that these changes or improvements are not available in the attached framework. This is just a practice exercise which you can try from your end.
Improvement 1) You would have noticed here that the test case flow in excel sheets is not modularized. For example, all the 3 test cases contain the flow of the login part (which means that login code is repeated in all the 3 test cases). You can try to modularize this flow where instead of having the complete test case flow in one excel sheet, you can try adding just a module, like login or create order in one excel sheet. This way you would be able to reuse many common flows.
Improvement 2) You would also have observed that the data is hard-coded with the flow. Because of this, if you want to run the flow for multiple data, you would need to change the data values before each run. To avoid this, you can try to separate the data from the flow by adding it to a separate excel sheet. This way you would be able to change the data without touching the flow and you can also re-run the same flow multiple times by using a loop.
Try out these changes and let me know if you face any issues in-between. If you have any points to add here, or if you have any other improvement which can be added in this framework, please let us know about it using the comments section.

If you enjoyed this article, you can join our blog to get new articles delivered directly in your inbox.
Visit QTP Frameworks Main Page for more articles on QTP Frameworks. You can also visit our QTP Tutorials page for more QTP Tutorials.


Pingback: Desigining Keyword Driven Framework mapped at Functional Level – Part 1 - Automation Repository - Automation Repository()
Pingback: Designing Keyword Driven Framework mapped at Functional Level – Part 2 - Automation Repository - Automation Repository()
Pingback: QTP Framework Tutorials - Framework Types, Examples & Code Snippets - Automation Repository()