Designing Data Driven Framework in QTP – Part 2
Background
- In the first article on Data Driven Framework, you saw how to create a Data Driven Framework in QTP using QTP Data Table as the Data Source. The article also covered the 3 different ways in which you can use Data Table and Excel sheets as a Data Source in QTP also with some limitations of the Data Table (only) approach.
- In the next article, we saw the 3 common ways in which data can be stored in Excel sheets and used in QTP Frameworks.
- Starting with this article, we will cover each of the above mentioned ways of storing data one by one.
UPDATES
1) You are free to download and play around with the code used for this framework. The download link is available at the end of the article.
2) Just like this, we have written more articles on various other QTP Frameworks. If you wish to have a look at those, please visit QTP Framework main page. The bottom of the page contains links to other QTP Frameworks.
Before we begin with designing data driven framework in this article, you may want to check articles this and this for understanding the basic concepts of a data driven framework such as –
- – What is a Data Driven Framework.
- – What is the structure or Architecture of a Data Driven Framework.
- – What are the different Data Sources that you can use with a Data Driven Framework in QTP.
- – How can you use some common data sources in QTP.
- – Sample scripts that show how you can create a basic data driven framework in QTP using QTP Data Tables.
What we will be doing in this article
1) As part of this article, we will be creating 3 test scripts that will work on Google and GMail.
2) All these 3 test cases will need some sort of data that will be populated in the application (Google or GMail). Instead of directly hard-coding the data in the test scripts itself (as we had done in QTP Linear Framework and Modular Framework Tutorial), we will save all the test data in the excel sheets and then write some custom functions that will pick up the required data from the excel sheets and then use them in the application.
3) In this way, we will be creating a basic data driven framework in QTP that will comprise of 3 test cases and will retrieve the data from the excel sheets.
Identifying Test Cases for this Framework
The first step for creating the framework is to identify the test cases that we will be automating as part of this framework. Below is the list of the test cases that we will be working on here.
1) TC_01_GmailInbox In this test script, we will log in to GMail and then will find out the number of unread emails in Inbox.
2) TC_02_GMailLabel In this test case, we will again log in to GMail and then create a new Label in GMail.
3) TC_03_GoogleSearch In this test case, we will open Google home page, then search for a string and will find out the number of results returned for that particular search.
Identifying the format of the Excel Sheet
After you have identified the test cases, you will need to do some analysis to find out what all data would be needed for these test cases and then figure out the appropriate data sheet format best suited for these test cases.
For this article we will be working on the data sheet format where each test case will have its own excel sheet. Since we have 3 test cases here, we will be using 3 excel sheets all saved in a single excel workbook. In short – 1 excel workbook having 3 sheets.
Identifying how you will fetch data from Excel Sheet
Once you have identified the format of the data sheet, you need to decide on the method that you will use to fetch data from the excel sheet. The method that we will use as part of this article is –
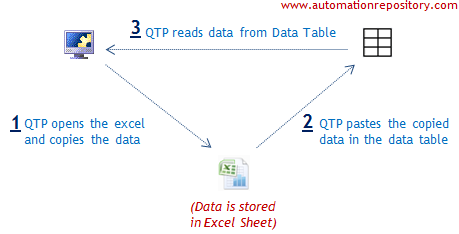
Step 1: QTP opens the excel workbook and copies the required data sheet.
Step 2: QTP then pastes the contents of this sheet into QTP Data Table.
Step 3: QTP uses its own functions to read the data from the Data Table.

Once you are done with all these initial things, you can start creating the test scripts.
Step by Step method to Create the First Test Case in the Framework
The relatively tougher part here is to write the first script or module and then modify it as per your framework. Once you have created your first script (as per framework) it becomes very each to write the remaining modules or test scripts.
This is because most of the important code such as connecting your test case with the data sheet and fetching the data would already have been done in the beginning itself. Once it is done, you only need to call these functions wherever required.
As an example, we will cover the Log in portion of GMail in detail here. Once you understand the concept, you can then build the rest of the code easily without any issues.
Step 1: Open QTP, create a new Test Case and save it at any desired location.
Step 2: Since this is the first test case of the framework, you can first write the script with hard-coded data. Then you run this code to verify that the functionality is working fine. Once you confirm that the functionality is working fine, you can write the code to that would fetch data from the data sheet.
Step 3: Create an Object Repository and associate it with your test case. Add the required objects and then write the code that will log in to GMail. The code should look something like this –
'Open GMail
SystemUtil.Run "iexplore.exe", "http://www.gmail.com"
'Page Sync
Browser("Gmail").Page("Gmail").Sync

'Login to Gmail
Browser("Gmail").Page("Gmail").WebEdit("UserName").Set "valid gmail login id"
Browser("Gmail").Page("Gmail").WebEdit("Password").Set "valid gmail password"
Browser("Gmail").Page("Gmail").WebButton("SignIn").Click

'Page Sync
Browser("Inbox").Page("Inbox").Sync
Run the above code and see if it is working fine.
Step 4: Now you have to create the data sheet for this test case. To do this, create a new excel workbook and save it as DataSheet.xls inside your framework folder. (you can give any meaningful name to the Workbook)
Step 5: Open the Workbook. You would find that there are 3 sheets in the Workbook – Sheet1, Sheet2 and Sheet3. You need to provide some meaningful name to the sheet that you are going to use. As a best practice, you can keep the same name for the test case and the excel sheet.
Since we are writing code for TC_01_GmailInbox, you can rename Sheet1 as TC_01_GmailInbox as shown below.
Step 6: The next step is to add data to ‘TC_01_GmailInbox’ sheet. From the above code you can notice that we have hard-coded 3 parameters in the script. These are GMail URL, User ID and Password. We would now add all these parameters in the data sheet. Add the data in the data sheet as shown in the below image.
Step 7: Now you have to write the code that will fetch data from the data sheet and then put it in the application. Check the below function that copies the excel data into QTP Data Table and then returns the value based on the column name.
Function fnGetDataTableValue(strColumnName)

  'Add a data sheet in the QTP Data Table
  DataTable.AddSheet("dtDataSheet")

  'Import the Excel Sheet into QTP Data Table
  DataTable.ImportSheet "D:\DataSheet.xls", sTestCaseName, "dtDataSheet"

  'Find and return the value based on the column name
  DataTable.SetCurrentRow 1
  fnGetDataTableValue = DataTable.Value(strColumnName, "dtDataSheet")

  'Remove Reference
  DataTable.DeleteSheet("dtDataSheet")

End Function
Step 8: Since this is a reusable function that will be re-used across all the 3 test cases, you should add this function in an external function library and then associate that function library to your test case. (For more info on this, read the 4th method in how to associate function library to a QTP script).
Step 9: Once you have associated the function library to your script, you can modify the main script so that now it takes data from the data sheet. The modified code is shown below –
'Get the Test Case Name that will be used in fnGetDataTableValue function
sTestCaseName = Environment.Value("TestName")

'Open GMail
sUrl = fnGetDataTableValue("URL")
SystemUtil.Run "iexplore.exe", sUrl
'Page Sync
Browser("Gmail").Page("Gmail").Sync

'Login to Gmail
sUserName = fnGetDataTableValue("UserID")
Browser("Gmail").Page("Gmail").WebEdit("UserName").Set sUserName
sPassword = fnGetDataTableValue("Password")
Browser("Gmail").Page("Gmail").WebEdit("Password").Set sPassword
Browser("Gmail").Page("Gmail").WebButton("SignIn").Click

'Page Sync
Browser("Inbox").Page("Inbox").Sync
The above code is the most basic way you can implement this concept. There is still room for a lot of improvement in the code. If you notice the code, you would see that we are first capturing the value from the Data Table in a variable and then we are then using it with the Set function (Lines 11-12 & Lines 13-14). This is not a good programming practice because we are using 2 lines of code to perform a small action.
So to make the code bit more readable, you can create a custom Set function, that will first fetch the value from the Data Table and then it will put it in the application. This can be achieved by using the concept of function overriding in QTP. The custom Set function would look something like this.
Function fnSetValue(objControl, strColumnName)

  Dim sReqdValue

  'Get value from DataTable
  sReqdValue = fnGetDataTableValue(strColumnName)

  objControl.Set sReqdValue

End Function
Since this function is also a reusable function, you have to add it to the function library and bind it to the WebEdit control. Your final code (for the login portion of the script) should look something like this.
'Get the Test Case Name that will be used in fnGetDataTableValue function
sTestCaseName = Environment.Value("TestName")

'Open GMail
sUrl = fnGetDataTableValue("URL")
SystemUtil.Run "iexplore.exe", sUrl
'Page Sync
Browser("Gmail").Page("Gmail").Sync

'Login to Gmail
Browser("Gmail").Page("Gmail").WebEdit("UserName").fnSetValue "UserID"
Browser("Gmail").Page("Gmail").WebEdit("Password").fnSetValue "Password"
Browser("Gmail").Page("Gmail").WebButton("SignIn").Click

'Page Sync
Browser("Inbox").Page("Inbox").Sync
Step 10: Run the above code and see if it runs without any errors.
Once this is done, you can create the remaining portions of the script in the same way shown above. Since the code to fetch data from the data table is already implemented, you need to just add required columns in the excel sheet and use the custom functions in the script to fetch those values.
This was all about the basics of Data Driven Framework approach where you can fetch the data from excel sheet through QTP Data Table. We have also created the code for all the 3 test cases using this same approach. If you wish, you can download the entire framework and use it as a reference in case you get stuck anywhere.
If you have any feedback or comments about this article, do let us know about it using the comments section.

If you enjoyed this article, you can join our blog to get new articles delivered directly in your inbox.
Visit QTP Frameworks Main Page for more articles on QTP Frameworks. You can also visit our QTP Tutorials page for more QTP Tutorials.


Pingback: Designing Data Driven Framework in QTP – Part 3 - Automation Repository - Automation Repository()
Pingback: QTP Framework Tutorials - Framework Types, Examples & Code Snippets - Automation Repository()
Pingback: complete real time scripts of qtp « TESTING HUB()
Pingback: Designing Data Driven Framework in QTP – Part 3 | Tech Lessons()