Designing Data Driven Framework in QTP – Part 3
If you have seen the previous articles on Data Driven Framework, we had discussed that there are 3 common ways in which you can store your data in excel sheets or QTP data table and then use it in a data driven framework. Of these 3 methods, we have already covered the first 2 methods in –
- QTP Data Driven Framework Part 1, where the test data was stored in QTP Data Table and we wrote the code that fetched the data directly from the data table.
- QTP Data Driven Framework Part 2, where the data was stored in excel sheets and we wrote the code where QTP first copied the data from excel sheet to QTP Data Table and then retrieved the data from the Data Table.
UPDATES
1) You are free to download and play around with the code used for this framework. The download link is available at the end of the article.
2) Just like this, we have written more articles on various other QTP Frameworks. If you wish to have a look at those, please visit QTP Framework main page. The bottom of the page contains links to other QTP Frameworks.
In this final part of the articles on QTP Data Driven Framework, we will cover the 3rd method of storing and retrieving data, where the data would be saved in excel sheet and would be directly fetched from excel sheet only (as opposed to the previous method where the data was first copied from excel sheet to QTP Data Table and then fetched from the data table).
This article will be created on the same lines as the previous article on Data Driven Framework. So let’s directly start with what all will be covered in this article.
In this article we will –
- 1) create 3 Test Scripts that will work on GMail and Google.
- 2) create a single excel workbook which will have only one excel sheet inside it. All 3 test cases will be added as 3 different rows in the same excel sheet.
Identifying Test Cases to be automated for this Framework
As part of this article, we will be automating the same set of test cases that we had automated in the previous article. These test cases are –
- 1) TC_01_GmailInbox: In this test script, we will login to GMail and then will find out the number of unread emails in Inbox.
- 2) TC_02_GMailLabel: Here, we will again login to GMail and then create a new Label.
- 3) TC_03_GoogleSearch: In this test case, we will open Google home page, then search for a string and will find out the number of results returned for that particular search.
Identifying the format of Excel Sheet
For the sample framework in this article, we will create an excel workbook and then add only a single sheet to it. All the test cases will be added as separate rows in the same excel sheet. Since we have 3 test cases, we will be having 3 rows of data in the excel sheet (without including the header).
Identifying how to fetch data from Excel Sheet
In this framework, the data will be fetched directly from the excel sheet only. That is, we would be writing code that would open the excel sheet and then fetch the data based on the row and column. This would be accomplished using Microsoft Excel Object Model.

Once you have identified the test cases, the data sheet format and the method using which you will fetch the test data, you can start creating your test scripts.
Step by Step method to Create the First Test Case in the Framework
To explain the entire process in a detailed step by step manner, we will take up the Login to GMail portion of the first test case and then explain it in detail. This would help you become familiar and comfortable with the process. Once this is done, you can yourself create the remaining test scripts without any issues.
Step 1: Open QTP, create a new Test Case and save it at any desired location.
Step 2: Since this is the first test case of the framework, we will write the script for GMail login and hard-code the data in the script itself. Then we will run the code to verify that the functionality is working fine. Once we have verified that the functionality is working fine, we can then write the code that will fetch data from the excel sheet.
Step 3: Create an Object Repository and associate it with your test case. Add the required objects for GMail login and then write the code. The code should look something like this –
'Open GMail
SystemUtil.Run "iexplore.exe", "http://www.gmail.com"
'Page Sync
Browser("Gmail").Page("Gmail").Sync

'Login to Gmail
Browser("Gmail").Page("Gmail").WebEdit("UserName").Set "valid gmail login id"
Browser("Gmail").Page("Gmail").WebEdit("Password").Set "valid gmail password"
Browser("Gmail").Page("Gmail").WebButton("SignIn").Click

'Page Sync
Browser("Inbox").Page("Inbox").Sync
Run the above code and see if it is working fine.
Step 4: Now you have to create the data sheet to replace the hard-coded data with your custom function that will fetch the data from the excel sheet.
To do so, create a new excel workbook and save it as DataSheet.xls inside your framework folder. (you can give any meaningful name to the Workbook)
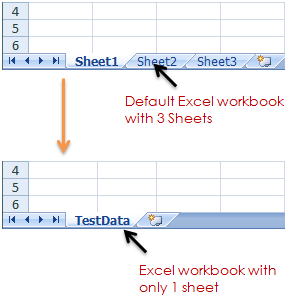
You would notice that the excel workbook already has 3 excel sheets – Sheet1, Sheet2 and Sheet3, added to it. Since we require only one data sheet in the workbook, delete sheets Sheet2 and Sheet3 from the excel workbook.
Now rename Sheet1 to some meaningful name (say TestData). Your excel workbook will look something like this.

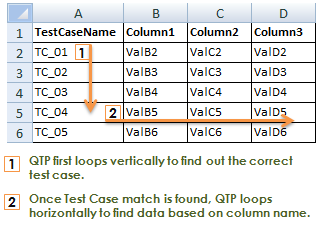
Step 5: Once you have created the data sheet, the next step will be to add data to this excel sheet. Add the data in the excel sheet as shown in the below image. Please note that the values in Column 1 should be same as the test case name, so that QTP can pick up the data correctly based on Test Case name.

Step 6: Now you will need to write the code that will fetch the data from this excel sheet. The logic for fetching the data goes like this.
- i. QTP opens the excel sheet.
- ii. QTP loops through the first column to read the test case name from each cell.
- iii. QTP compares the test case name (from the excel) with the current test case name (which is currently opened in QTP).
- iv. Once a match is found on the test case name, QTP the loops horizontally to read the data from the particular row where the test case name matched.

Check the below code that will fetch data based on Test Case name and Column Name.
Function fnGetDataFromExcel(strColumnName)

Dim iReqdCol
fnGetDataFromExcel = "<empty>"

'Open the Excel
Set oExcel = CreateObject("Excel.Application")
Set oWorkbook = oExcel.Workbooks.Open(sExcelPath)
Set oSheet = oExcel.Sheets("TestData")

'Find the total number of rows in the excel
iRows = oSheet.UsedRange.Rows.Count
iCols = oSheet.UsedRange.Columns.Count

'Find the column number from where data needs to be fetched
For iC = 2 to iCols 'Loop started from 2 because the first column is Test Case name
If oSheet.Cells(1, iC).Value = strColumnName Then
iReqdCol = iC
Exit For
End If

Next

'Loop through the rows to find the test case name
For i=2 to iRows 'Loop started from 2 because 1st row is header
If oSheet.Cells(i, 1).Value = sCurrentTestCase Then
fnGetDataFromExcel = oSheet.Cells(i, iReqdCol)
End If
Next

'Close the Excel
oExcel.Quit()
Set oExcel = Nothing
Set oWorkbook = Nothing
Set oSheet = Nothing

End Function
Step 7: As done in the previous article, you can create a custom set function that will first fetch the value from the excel sheet and then it will populate the fetched value in required text boxes in the application. The code for the custom function is shown below.
Function fnSetValue(objControl, strColumnName)

  Dim sReqdValue

  'Get value from Excel Sheet
  sReqdValue = fnGetDataFromExcel(strColumnName)

  objControl.Set sReqdValue

End Function
Since both these functions (shown in Step 6 and Step 7) are functions that will be reused across all the 3 test cases, you would need to store them in an external function library and associate the function library with all the 3 test cases. The final code (for the login portion of the script) should look something like this.
'Get the Test Case Name that will be used in fnGetDataFromExcel function
sTestCaseName = Environment.Value("TestName")

'Open GMail
sUrl = fnGetDataFromExcel("URL")
SystemUtil.Run "iexplore.exe", sUrl
'Page Sync
Browser("Gmail").Page("Gmail").Sync

'Login to Gmail
Browser("Gmail").Page("Gmail").WebEdit("UserName").fnSetValue "UserID"
Browser("Gmail").Page("Gmail").WebEdit("Password").fnSetValue "Password"
Browser("Gmail").Page("Gmail").WebButton("SignIn").Click

'Page Sync
Browser("Inbox").Page("Inbox").Sync
Step 10: The above code covers the login portion of the test case where the values are fetched from the excel sheet. Run this code and check that it is working fine without any errors. Once this is done, you can use the same steps above to complete this test case and then work on the remaining 2 test cases also.
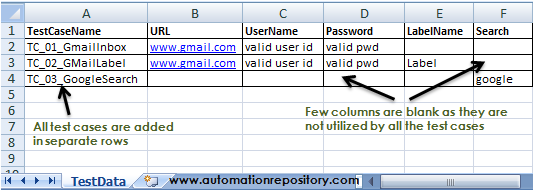
While adding data for the remaining two test cases, all that you have to do is to add some additional columns (if required) and add the data in different rows. Once this is done, the custom functions will pick up the required values based on the test case name and the column names. The below figure shows how the excel sheet might look like once you add data for all the test cases in the excel sheet.

This was all about the different common ways in which you can use the data driven framework in QTP. If you are beginner in QTP, I would recommend that you go through all the articles on Data Driven Framework from QTP Framework Main Page link so that you have a clear idea about the different ways in which you can use the data driven framework. This would help you understand the entire process and thus you would be in a better position to choose appropriate framework based on your needs.
You can also download the code for this framework from the below download link. If you have any feedback or comments about this article, do let us know about it using the comments section.

If you enjoyed this article, you can join our blog to get new articles delivered directly in your inbox.
Visit QTP Frameworks Main Page for more articles on QTP Frameworks. You can also visit our QTP Tutorials page for more QTP Tutorials.


Pingback: QTP Framework Tutorials - Framework Types, Examples & Code Snippets - Automation Repository()
Pingback: complete real time scripts of qtp « TESTING HUB()